Search This Blog
Thursday, October 31, 2013
InfoPath Forms Services not working due to invalid State Service configuration -Event 7898 (SharePoint Server 2010)
InfoPath Forms Services data adapter security error query -Event 6932 (SharePoint Server 2010)
Thursday, February 14, 2013
Auto-Numbering InfoPath Forms
------------------
http://claytoncobb.wordpress.com/2009/06/15/auto-numbering-infopath-forms/
Rich Text Box Controls in Browser-Enabled InfoPath Forms
Over the years of developing InfoPath forms, I have become aware of many idiosyncrasies of browser-enabled forms. I usually find myself trying to find workarounds for designs that are simple in a client based InfoPath form but fall apart in browser-enabled forms. In this post, I present a workaround for using rich text boxes in browser-enabled InfoPath forms.
In the last project I worked on, I had an InfoPath form which required several text boxes to be on a page (as many as 24). The original design of this form had each of these text boxes in the form as rich text boxes. Most of these rich text boxes had data validation rules as well as conditional formatting. I wasn’t breaking any of the rules for making the form browser-enabled and the form worked great in preview mode. Everything was fine until I began using the form in the browser.
Some of the behavior in the browser included:
- The toolbar for the rich text box hides the label for the rich text box.
-
The toolbar for the rich text box wouldn’t always disappear (even when focus was moved from the textbox). But a teammate discovered that if you click in the upper right corner of the toolbar, it will close out the toolbar.
- Moving focus from a rich text box causes a postback to the server (because of the validation and conditional formatting) and doesn’t always return focus to the appropriate control on the page. This may leave the user in a different section of the form and cause confusion for the user.
- Validation for a rich text box does not always work.
-
With this validation rule, if the user enters text into a rich text box and then deletes the text, once focus has moved from the rich text box control, the form does not show an error for the control. This happens because the markup HTML for the control still contains <div></div>, making the XML node for the rich text box control not blank. Therefore, a user is able to complete the form without filling out a required field. The attempted workaround was to set the validation to require a minimum of 20 characters. (This works, but it’s not quite elegant).
With all these things added up, the performance and usability of the form decreased significantly enough to require some sort of workaround. It turned out that there was no real need to include rich text boxes because the users most likely would not take advantage of the formatting provided in the toolbar. The biggest sacrifice was that a rich text box’s height would expand to show all the content within the control whereas a regular text box has a set height. Since the customer was willing to live with this sacrifice, the rich text boxes were changed to regular text boxes with a set height (about 100px to indicate the text box required a lengthy answer). The standard data validation rules work just fine for a text box (if field1 is blank, then “This field is required”). This simple change improved performance and usability tremendously.
This form also had a read-only version. In this read-only version, expression boxes were used to display the data from these text boxes. An expression box will expand to show all content in a field. The expression boxes were even modified to look like a text box (modify the Borders and Shading to change the outline and the background to be white); even with gray text to indicate the control is read-only.
Each InfoPath project seems to provide a new opportunity for imaginative workarounds. In this specific case, the increased number of rich text boxes on a single page is what affected performance and usability. It’s not that rich text boxes shouldn’t be used in browser-enabled InfoPath forms, it’s just that they should be used sparingly and deliberately.
Happy InfoPath form designing!
Friday, January 25, 2013
How to submit data from an InfoPath 2010 form to SharePoint 2010 List, in just 10 Steps
- How to submit data from an InfoPath 2010 form to SharePoint 2010 List, in just 10 Steps
-
This post covers a step by step guide to add/update data from InfoPath to SharePoint.The prerequisites for this post and the tasks covered are SharePoint 2010 and Microsoft OfficeInfoPath Designer 2010 installed on your machine.Having a good understanding about CAML(Collaborative Application Markup Language), aknowledge of the methods of the SharePoint Lists web service would be really helpful.
To get more information about the SharePoint Lists web service:Open IE navigate to "http://servername/_vti_bin/lists.asmx?WSDL"(You will be able to see all the web methods associated with the Lists web service. For ourpurpose we will be using UpdateListItemsweb method).STEP 1. Create a Custom List in a SharePoint Site, 'Employee'. Also create some columns asper your need.Note that there will be a default column called 'Title' and lets not change it and keep it that way tostore EmployeeName, I've create EmployeeAddress, EmployeeNo, EmployeeEmail as columnswhich are Single text.
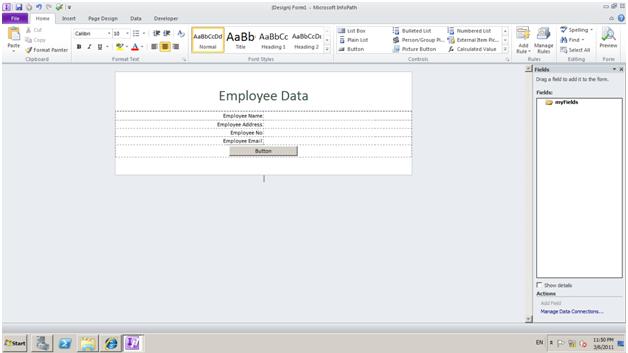
STEP 2. Open Microsoft Office InfoPath Designer 2010 and select a Blank Form and clickDesign Form. Then do as follows.
Form Options 
Security and Trust 
Full Trust 
Programming 
Design 
Design 
Design 
Renaming the button 
Add fields STEP 3. In SharePoint site under Employee list, in ribbon under List Tools select List and then select List Settings. In that page click Advanced Settings and select Allow management of content types to Yes.
List Settings
STEP 4. Again go to List Settings click Metadata navigation settings and copy the list GUID.
Copy list GUID
STEP 5. Go back to InfoPath form right click on listID and paste GUID under value field.STEP 6. Open Notepad and type,
<?xml version="1.0" encoding="UTF-8" >?
<Batch>
<Method ID="1" Cmd="New">
<Field Name='Title' />
<Field Name="EmployeeAddress" />
<Field Name="EmployeeNo" />
<Field Name="EmployeeEmail" />
</Method>
</Batch>
Save the file as an xml file and name it Submit.xml.
STEP 7. Now lets create Data Connections. Go to InfoPath form and click Manage Data Connections. First we need to create a Receive Data connection. I am naming it as 'Submit'.
Receive Data 
XML Document 
Browse for the created Submit.xml file 
Naming the connection as 'Submit' STEP 8. Now we need to create a Submit Data Connection. Again in Manage Data Connections click Add.
Add 
Submit Data 
To a Web Service 
http://servername/_vti_bin/lists.asmx?WSDL 
UpdateListItems 
listname 
listID 
Include : Text and child elements only 
Updates 
Secondary 
Batch 
Include : XML Subtree, including selected element 
Web Service Submit 
Edit Form Code STEP 9. Click Edit Form Code and btnSubmit_Clicked event will be created. In that block, type the following code.try{XPathNavigator root = MainDataSource.CreateNavigator();// Retrieve the values for the separation list itemstring listID = root.SelectSingleNode("/my:myFields/my:listID", NamespaceManager).Value;string eNameDS = root.SelectSingleNode("/my:myFields/my:EmployeeName", NamespaceManager).Value;string eAddressDS = root.SelectSingleNode("/my:myFields/my:EmployeeAddress", NamespaceManager).Value;string eNoDS = root.SelectSingleNode("/my:myFields/my:EmployeeNo", NamespaceManager).Value;string eEmailDS = root.SelectSingleNode("/my:myFields/my:EmployeeEmail", NamespaceManager).Value;if (listID == null){}else{//This is CAML xml file. it contains batch and method nodesXPathNavigator batch = DataSources["Submit"].CreateNavigator();batch.SelectSingleNode("/Batch/Method/Field[@Name='Title']", NamespaceManager).SetValue(eNameDS);batch.SelectSingleNode("/Batch/Method/Field[@Name='EmployeeAddress']", NamespaceManager).SetValue(eAddressDS);batch.SelectSingleNode("/Batch/Method/Field[@Name='EmployeeNo']", NamespaceManager).SetValue(eNoDS);batch.SelectSingleNode("/Batch/Method/Field[@Name='EmployeeEmail']", NamespaceManager).SetValue(eEmailDS);DataConnections["Web Service Submit"].Execute();}catch (Exception ex){ex.Message.ToString();}STEP 10. And finally thats all. Preview the form and try submitting the data. After that publish the form and upload the form template into SharePoint and start using.There are few important things to remember carefully.- There is a significant difference between Display name and the Field name. When we are doing the coding we are using the value under the Field name. If you can remember, I have mentioned to keep the default 'Title' column as it is, because if we rename the 'Title' column it will just change the display name. The Field name will be remain as 'Title'.
- No of updating list fields should be the same as no xml field names.
- When I am creating columns in SharePoint list, if you can remember I have included no spaces between words. Thats because it will add characters into Field names. So when we are referring to Field names from looking at Display names, the Field name is actually differs from the Display name.
- List fieldname should be same as xml fieldname.
- Make sure when creating the Submit Data connection 'Web Service Submit' to select following things,
- listName - listID : Include : Text and Child elements only
- updates - Batch : Include : XML subtree, including selected element