Search This Blog

Thursday, September 30, 2010

InfoPath - Hide Textbox

InfoPath Basics - Display text box if user selects Other using conditional formatting

Promote two fields to a single SharePoint or Database column/field.

This article demonstrates how to configure an InfoPath form to display an optional text box for the user to enter a custom value if not available from the list of options. A separate field in the main data source of the InfoPath form will be used to store the value of the selected option, or the custom value if supplied by the user. Rules are set up to set the value of the separate field in the data source when an option is selected or when a custom value is entered into the text box. When submitting the form, the text field with either the value selected, or the optional text input entered if the user selects other can be promoted to a single SharePoint column, or database table instead of promoting both the option field and the text field containing the "Other" value if selected.

Conditional formatting is also used to hide the text box until the user selects "Other" from the list of options.


Process:

Set up the Initial InfoPath Form

1. Design a new form template using InfoPath 2003 or 2007

2. From the Task Pane (CTRL+F1), open the Controls toolbar

3. Double click, or drag an Option Button control onto the default view of the form template. Enter the number of options required (remember to add an additional option for "Other").
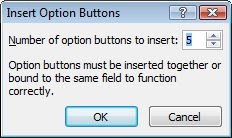


> Note: In this example, the Option Button will have 5 options including "Other". The name of this field in the Main Data Source will be "Options"

4. Right Click the first Option and select "Option Button Properties..."
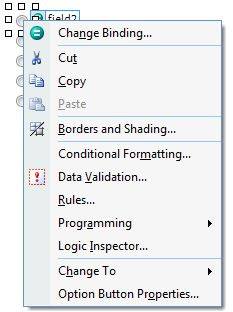


5. Enter a Field Name for the field. Note: You only need to set the field name on one of the options for it to be applied to all.

6. Enter the value which will be used when this option is selected for the "Value when selected".

7. Press Ok
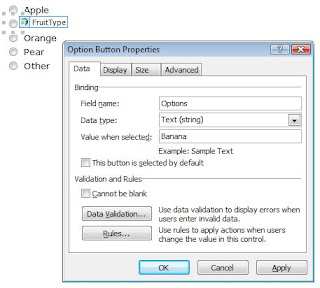


8. Repeat Step 6 for each option. Enter "Other" as the value when selected for the final option.

9. Add a text field control to the form template (main data source) for a user to enter a custom value if required.
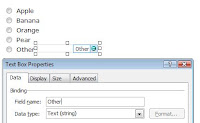


Note: In this example this field will be called "Other".

10. Add a separate text field to the form's Data Source only to store the selected value, or the value from the "Other" field by selecting "Add..." from the menu after right clicking the "myFields" group.
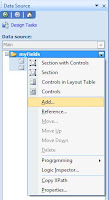


Note: For the purpose of this article, this field will be called "OptionSelected". This field does not need to be added to the form template. This field will contain the selected value from either the "Options" field or the custom value from the "Other" text field if required, and is explained further in the article.

Add Conditional Formatting to hide the "Other" text field when it is not required
11. Right Click on the "Other" text field control on the form template.
12. Select Conditional Formatting...
13. Press the "Add..." button to add a condition
14. Select the "Options" field created in step 3, "is not equal to" for the condition, and a text value of "Other" to test against (Select "Type text..." from the options).


15. Tick the "Hide this control" option for the formatting to be applied.
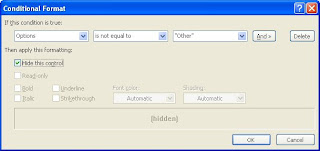


The "Other" text field will now only be visible when the user selects the "Other" option radio button.

Saturday, September 25, 2010

Ajax-CalenderExtender

<html>

<head runat="server">

    <title>AJAX Calendar Theme</title>

    <link href="calendar.css" rel="stylesheet" type="text/css" />

</head>


<body>

    <form id="form1" runat="server">

        <div>

            <asp:ScriptManager ID="ScriptManager1" runat="server">

            </asp:ScriptManager>

            <ajaxToolkit:CalendarExtender ID="CalendarExtender1" runat="server" CssClass="cal_Theme1"


                TargetControlID="TextBox1" PopupPosition="Right">

            </ajaxToolkit:CalendarExtender>

        </div>

        <asp:TextBox ID="TextBox1" runat="server"></asp:TextBox>

    </form>

</body>


</html>

Friday, September 24, 2010

Styles-GridRowDataBound

aspx.cs
----------

protected void GridView1_RowDataBound(object sender, GridViewRowEventArgs e)
{
if (e.Row.RowType == DataControlRowType.DataRow)
{
e.Row.Attributes.Add("onmouseover", "this.style.backgroundColor='#94a8b7'");
// This will be the back ground color of the GridView Control
if (e.Row.RowIndex % 2 == 0)
{
e.Row.Attributes.Add("onmouseout", "this.style.backgroundColor='#d0d9e2'");
}
else
{
e.Row.Attributes.Add("onmouseout", "this.style.backgroundColor='#e7ebf0'");
}


}
}

Thursday, September 9, 2010

InfoPath Tip: Working with radio buttons and check boxes

1. This is how form with controls will look like.
clip_image001
Fig 1: Form
2. Add conditional formatting to Section 1 to hide it when Checkbox 1 is checked.
clip_image002
Fig 2: Conditional formatting for Section 1
3. Add conditional formatting to Section 2 to hide it when Checkbox 2 is checked.
4. Add rule to Option 1. By default, the value of Option button 1 is "1" and value of option button 2 is "2". Name rule "Open Section1" and set condition:
clip_image003
Fig 3: Set condition for Rule "Open Section1"
5. After setting the condition, click "Add Action" button to add action. In the "Field", select "Checkbox1" then click the "fx" button to add formula.
clip_image004
Fig 4: Add Action
6. Use "Insert Function" button to add "boolean" function or write it directly in the formula box. Click "Verify Formula" button to verify the formula and then click "OK".
clip_image005
Fig 5: Add Formula
7. You need to add three more rules. The rules are shared between the two radio buttons. Rules established for any of the buttons, both buttons. Add the second rule of "Close Section 2". Set the following condition:
clip_image006
Fig 6: Set condition for rule "Close Section 2"
Add action for this rule. Select "Checkbox1" in "Field" and leave the value blank. This will uncheck the "Checkbox1".
8. Add third rule "Open Section 2" to open the section 2. Condition set: Options is equal to "2" and add the action: "CheckBox2" has a value "Boolean (" true "). Use the technique described above to add formula. Remember, the formula of writing by hand is not set the Boolean value and will be considered as plain text in InfoPath.
9. Add fourth rule "Close Section 1". Add following condition:
clip_image007
Fig 7: Set condition for rule "Close Section 1"
Add following action:
clip_image008
Fig 8: Add action
Select "CheckBox1" in the "field" and uncheck the value. This disables the "CheckBox1". Remember that the sections are associated with those checkboxes. Checking CheckBox1 display section 1 and unchecking that hides in section 1. Similarly, CheckBox2 display control section 2 and unchecking that hides in section 2.
That's all. The point, in short, is that you must set the value of the box to "blank" to disable. Setting it to "False" is not uncheck.

InfoPath-Automatically change the first letter of a word/sentence to upper case

Problem


When an InfoPath user types in the text "example" or "this is really cool!", you would like this text to
automatically be changed into "Example" or "This is really cool!" when the user leaves the text field.

Solution


Use the concat(), substring(), translate(), and string-length() functions
in a formula to format the text field.


Discussion


You can accomplish this functionality as follows:


  1. Create a New Blank Form in InfoPath.

  2. Add a Text Box control to the form.

  3. Double-click on the text box control to open its Properties dialog box.


  4. Click on the Insert Formula button behind the Default Value field.

  5. Enter the following formula on the Insert Formula dialog box:


    concat(substring(translate(., "abcdefghijklmnopqrstuvwxyz", "ABCDEFGHIJKLMNOPQRSTUVWXYZ"), 1, 1), substring(., 2, string-length(.) - 1))


  6. Click on the OK button when closing all open dialog boxes.


The first letter of a word or sentence typed into the text box should now automatically be converted into an upper case letter
whenever the text box loses the focus.

InfoPath-Automatically change the first letter of a word/sentence to upper case

Problem


When an InfoPath user types in the text "example" or "this is really cool!", you would like this text to
automatically be changed into "Example" or "This is really cool!" when the user leaves the text field.


Solution


Use the concat(), substring(), translate(), and string-length() functions
in a formula to format the text field.


Discussion


You can accomplish this functionality as follows:


  1. Create a New Blank Form in InfoPath.

  2. Add a Text Box control to the form.

  3. Double-click on the text box control to open its Properties dialog box.


  4. Click on the Insert Formula button behind the Default Value field.

  5. Enter the following formula on the Insert Formula dialog box:


    concat(substring(translate(., "abcdefghijklmnopqrstuvwxyz", "ABCDEFGHIJKLMNOPQRSTUVWXYZ"), 1, 1), substring(., 2, string-length(.) - 1))


  6. Click on the OK button when closing all open dialog boxes.


The first letter of a word or sentence typed into the text box should now automatically be converted into an upper case letter
whenever the text box loses the focus.

InfoPath-DateDifference without Code

As you all know, DateDiff doesn’t exists in InfoPath, so do we have to do when we want to calculate the number of days between 2 given dates?  Tnx Alex Pojidaev’s hto share this with the world
What do we need

- 2 date fields in the datasource, startDate, endDate

- 1 text field dayDifference
Step by Step

- Go to the datasource of your InfoPath Form

- Go to the properties of startDate field, and add a rule

            Condition:   endDate is not blank

            Actions:  Set field dayDifference = 0;4096


- Go to the properties of endDate field, and add a rule

            Condition:   startDate is not blank

            Actions:  Set field dayDifference = 0;4096


- Go to the properties of dayDifference field, and add 2 rules


       RULE 1

            Condition:   The Expression : xdDate:AddDays(../my:startDate, substring-before(., “;”)) != ../my:endDate AND

                                     DayDifference contains ;

            Actions:  Set field dayDifference = concat(substring-before(., “;”) + substring-after(., “;”) * ((translate(addDays

                         (startDate, substring-before(., “;”)), “-”, “”) < translate(endDate, “-”, “”)) * 2 – 1), “;”, substring-after(., “;”) / 2)


       (Don’t forget the select the Edit Xpath checkbox)


  RULE 2

             Condition:   DayDifference contains ;

            Actions:  Set field dayDifference = substring-before(., “;”)


Your form is ready, it works also in repeating controls.


DateDiffCodeless

InfoPath-How to send URL from Infopath to the browser

How to send URL from Infopath to the browser
-----------------------------------------------
System.Diagnostics.Process process = new System.Diagnostics.Process();

process.StartInfo.UseShellExecute = true;
process.StartInfo.FileName = "your custom url";

process.Start();

Saturday, September 4, 2010

Links

http://www.primaryobjects.com/ArticleDirectory.aspx

http://aaphadnis.spaces.live.com/blog/cns!AE185D0790C274B1!193.entry

Using Active Directory to authenticate users to your ASP.NET Web Site.

ASP.NET membership provides the ability to authenticate users to your web application using forms based authentication against a database of users or directory services. This article explains the steps required to provide authentication against Active Directory, either for new sites with no authentication, or for existing sites using database authentication.

Step 1 – Set up the Active Directory connection string

The Active Directory connection string is simliar to the database connection string used in ASP.NET, except that it references an LDAP address. The connection string is specified in the web.config file.

The following string will authenticate users in the entire company.com.au tree:

<connectionStrings>
<add name="ADConnectionString"
connectionString="LDAP://company.com.au/DC=company,DC=com,DC=au"/>
</connectionStrings>

If you want to restrict authentication to a particular OU, then you specify it in the connection string like so:

<connectionStrings>
<add name="ADConnectionString"
connectionString="LDAP://dept.company.com.au/CN=dept,DC=company,DC=com,DC=au"/>
</connectionStrings>

Step 2 – Configure the Membership provider

In your web.config file, create or change the following entry to configure the Membership provider for Active Directory within the <system.web> section:

<membership defaultProvider="MyADMembershipProvider">
<providers>
<add name="MyADMembershipProvider"
type="System.Web.Security.ActiveDirectoryMembershipProvider,
System.Web, Version=2.0.0.0, Culture=neutral,
PublicKeyToken=b03f5f7f11d50a3a"
connectionStringName="ADConnectionString"
attributeMapUsername="sAMAccountName"/>
</providers>
</membership>

The connectionStringName attribute should match the name of the connection string you created in Step 1.

You can configure the credentials used to access Active Directory using the connectionUserName and connectionPassword attributes. If you leave these blank then your application's process identity is used to access Active Directory, regardless of whether your application uses impersonation.

Step 3 – Configure the Authentication and Authorization parameters

In your web.config file, create or change the following entry to configure the authentication and authorization parameters for Active Directory within the <system.web> section:

<authentication mode="Forms">
<forms name=".ADAuthCookie" timeout="43200"/>
</authentication>
<authorization>
<deny users="?"/>
<allow users="*"/>
</authorization>

The authorization settings above require every user to authenticate before accessing your web application. ASP.NET will automatically redirect these users to a Login.aspx page.
Step 4 – Create a Login page
The simplest way of creating the login page (which must be called Login.aspx) is by using the ASP.NET Login control as the following example demonstrates:

<form id="form1" runat="server">
<asp:Login ID="Login1" runat="server">
<LayoutTemplate>
<p>
<asp:TextBox runat="server" ID="Username" />
</p>
<p>
<asp:TextBox runat="server" ID="Password" TextMode="Password" />
</p>
<p>
<asp:CheckBox ID="RememberMe" runat="server" />
</p>
<asp:Button ID="btnLogin" runat="server" CommandName="Login" />
</LayoutTemplate>
</asp:Login>
<br />
<asp:Label ID="lblLoginErrorDetails" runat="server" />
</form>

If you are using the Login control, you MUST name your user name and password text boxes exactly as shown in the example.

The Login control can also provide error checking through the built in LoginError subroutine:

Protected Sub Login1_LoginError(ByVal sender As Object,
ByVal e As System.EventArgs) Handles Login1.LoginError
If Login1.UserName = String.Empty And Login1.Password = String.Empty Then
lblLoginErrorDetails.Text = "Please enter your username and password."
ElseIf Login1.UserName = String.Empty Then
lblLoginErrorDetails.Text = "Please enter your username."
ElseIf Login1.Password = String.Empty Then
lblLoginErrorDetails.Text = "Please enter your password."
Else
Dim userInfo As MembershipUser = Membership.GetUser(Login1.UserName)
LoginError.Visible = "True"
If userInfo Is Nothing Then
lblLoginErrorDetails.Text = "There is no user in the database
with the username " & Login1.UserName & ". Please try again."
Else
If Not userInfo.IsApproved Then
lblLoginErrorDetails.Text = "Your account has not yet been
approved. Please try again later."
ElseIf userInfo.IsLockedOut Then
lblLoginErrorDetails.Text = "Your account has been locked
out due to maximum incorrect login attempts. Please
contact the site administrator."
Else
lblLoginErrorDetails.Text = "Your password is incorrect,
please try again."
End If
End If
End If
End Sub

That’s all you should need to allow your users to log on. This is just the beginning of using Active Directory authentication for your web site, stay tuned for further articles in this series!

ACTIVE DIRECTORY AND .NET

Some time ago I was working in a project where I had to design and develop a service
to synchronize a human resources database with an Active Directory (AD). To accomplish my goal, I created a service that used .NET Directory Services, and after some months, the project succeeded. I had to invest a ton of extra hours to the project because I had a hard time finding sample .NET code and documentation related to specific tasks needed to work with AD User Accounts.


Microsoft Technet offers a
script repository
to work with AD User Accounts; however, I needed to work with .NET and I could not find samples for all the tasks I needed to program. I promised to myself that one day I would publish the code samples I found and created to help other developers who are working with Directory Services. So, I wish you a happy AD.NET programming and I hope my work saves you some time. The code samples I provide are written in C#.


How to...


  1. Create a connection to Active Directory

  2. Create a secure connection to Active Directory

  3. Validate if a user exists


  4. Set user's properties

  5. Set user's country

  6. Set user's password

  7. Enable a user account

  8. Add a user to a group

  9. Generate a mailbox for a user in Microsoft Exchange Server

  10. Create a user account

  11. Disable a user account

  12. Update user account


  13. Validate if a string has a correct email pattern

  14. Extract a user alias from an email account

  15. Format dates to AD date format (AAAAMMDDMMSSSS.0Z)

  16. Search users


1. Create a connection to Active Directory


/// <summary>


/// Method used to create an entry to the AD.

/// Replace the path, username, and password.


/// </summary>

/// <returns>DirectoryEntry</returns>

public static DirectoryEntry GetDirectoryEntry(){

    DirectoryEntry de 
= new DirectoryEntry();


de.Path "LDAP://192.168.1.1/CN=Users;DC=Yourdomain";

    
de.Username @"yourdomain\sampleuser";

    
de.Password "samplepassword";

    return 
de;


}


2. Create a secure connection to Active Directory


To connect to the AD, you need a user account that belongs to the domain you want to connect to. Most user accounts have permissions to search the AD; however, to modify the AD, you need a user account that is a member of the group of Domain Administrators (DomainAdmin). An account that belongs to this group has high privileges and hardcoding the user and password of this account in your code can compromise the security of the AD. I don't recommend you to create directory entries where usernames and passwords are hardcoded. Try to connect to the AD using a secure connection.


/// <summary>

/// Method used to create an entry to the AD using a secure connection.


/// Replace the path.

/// </summary>

/// <returns>DirectoryEntry</returns>

public static DirectoryEntry GetDirectoryEntry(){


    DirectoryEntry de 
= new DirectoryEntry();

    
de.Path "LDAP://192.168.1.1/CN=Users;DC=Yourdomain";

    
de.AuthenticationType AuthenticationTypes.Secure;


    return 
de;


To connect to the AD using a secure connection, you need to delegate the permissions of a user account with DomainAdmin permissions to the thread that is running a program. For instance, I created an exe and I ran the program using the Run As command to start a program. I delegated the user’s principal identity and culture to the current thread that runs the program. To delegate the principal identity and culture to the current thread, I used the following code:


/// <summary>


/// Establish identity (principal) and culture for a thread.

/// </summary>

public static void SetCultureAndIdentity(){


    AppDomain.CurrentDomain.SetPrincipalPolicy(PrincipalPolicy.WindowsPrincipal)
;

    
WindowsPrincipal principal (WindowsPrincipal)Thread.CurrentPrincipal;

    
WindowsIdentity identity (WindowsIdentity)principal.Identity;

    
System.Threading.Thread.CurrentThread.CurrentCulture = new CultureInfo("en-US");


}


3. Validate if a user exists


/// <summary>

/// Method to validate if a user exists in the AD.


/// </summary>

/// <param name="UserName"></param>

/// <returns></returns>

public bool UserExists(string UserName){


    DirectoryEntry de 
ADHelper.GetDirectoryEntry();

    
DirectorySearcher deSearch = new DirectorySearcher();

    
deSearch.SearchRoot =de;


deSearch.Filter "(&(objectClass=user) (cn=" + UserName +"))"

    
SearchResultCollection results deSearch.FindAll();


    if
(results.Count == 0){

         
return false;

    
}

    
else{

        
return true;


}

}


4. Set user's properties


/// <summary>

/// Helper method that sets properties for AD users.


/// </summary>

/// <param name="de"></param>

/// <param name="PropertyName"></param>

/// <param name="PropertyValue"></param>


public static void SetProperty(DirectoryEntry de, string PropertyName, string PropertyValue){

    
if(PropertyValue!=null){

        
if(de.Properties.Contains(PropertyName)){


            de.Properties[PropertyName][
0]=PropertyValue

        
}

        
else{

            de.Properties[PropertyName].Add(PropertyValue)
;

        
}


    }

}


5. Set user's country


To set the country property for a user was one of the tasks that took me some time to figure out. After some hours of research I realized that you need to know the ISO 3166 Codes for countries and set three properties to define a user’s country: c, co, and countryCode.


// Set the co property using the name of the country.


SetProperty(newuser,"co","MEXICO");

// Set the c property using the two-letter country code (ISO 3166 A 2).


SetProperty(newuser,"c","MX");

// Set the countryCode property using the numeric value (ISO 3166 Number) of the country.


SetProperty(newuser,"countryCode","484");


6. Set user's password


Setting the password for a user requires some work. I will walk you through the steps I followed to set a password for a user:


  1. Create or download a helper class that generates random passwords that comply with the strong password rules. I was short of time and couldn’t develop one, so I downloaded the RandomPassword class created by Obviex™.


  2. Create a method that consumes the RandomPassword helper class.

    /// <summary>

    /// Method that consumes a helper class library

    /// to generate random passwords.


    /// </summary>

    /// <returns></returns>

    public string SetSecurePassword(){

        RandomPassword rp 
    = new RandomPassword();


        return 
    rp.Generate(8,8);

    }


  3. Set the password property using the usr.Invoke method.


    /// <summary>

    /// Method to set a user's password

    /// <param name="path"></param>

    public void SetPassword(string path){


        DirectoryEntry usr 
    = new DirectoryEntry();

        
    usr.Path path;

        
    usr.AuthenticationType AuthenticationTypes.Secure;


        object
    [] password = new object[] {SetSecurePassword()};

        object 
    ret usr.Invoke("SetPassword", password );


    usr.CommitChanges();

        
    usr.Close();

    }


    The usr.Invoke method can be called once within the same AppDomain, otherwise your program will crash. If you place a call to the usr.Invoke method inside a for construct, the first run will be succesful, but the second one will crash the compiler. I created a workaround that helped me to solve this problem. I made a separate console application (SetPassword.exe) and I called and started the process programatically from the SetPassword method.


    1. Download the SetPassword project.

    2. Copy the SetPassword.exe file in your application.

    3. Call and start SetPassword.exe from you application.

      /// </summary>

      /// Method that calls and starts SetPassword.exe


      /// <param name="path"></param>

      /// <param name="password"></param>

      public void SetPassword(string path, string password){


          StringBuilder args 
      = new StringBuilder();

          
      args.Append(path);

          
      args.Append(" ");

          
      args.Append(password);


      ProcessStartInfo startInfo = new ProcessStartInfo("SetPassword.exe",args.ToString());

          
      startInfo.WindowStyle ProcessWindowStyle.Hidden;

          
      Process.Start(startInfo);


      }


7. Enable a user account


/// <summary>

/// Method to enable a user account in the AD.

/// </summary>


/// <param name="de"></param>

private static void EnableAccount(DirectoryEntry de){

    
//UF_DONT_EXPIRE_PASSWD 0x10000

    
int exp (int) de.Properties["userAccountControl"].Value;


de.Properties["userAccountControl"].Value exp | 0x0001;

    
de.CommitChanges();

    
//UF_ACCOUNTDISABLE 0x0002

    
int val (int) de.Properties["userAccountControl"].Value;


de.Properties["userAccountControl"].Value val & ~0x0002;

    
de.CommitChanges();

}


8. Add a user to a group


/// <summary>

/// Method to add a user to a group


/// </summary>

/// <param name="de"></param>

/// <param name="deUser"></param>

/// <param name="GroupName"></param>


public static void AddUserToGroup(DirectoryEntry de, DirectoryEntry deUser, string GroupName){

    DirectorySearcher deSearch 
= new DirectorySearcher();


deSearch.SearchRoot de;

    
deSearch.Filter "(&(objectClass=group) (cn=" + GroupName +"))"

    
SearchResultCollection results deSearch.FindAll();


    bool 
isGroupMember = false;


    if 
(results.Count>0){

        DirectoryEntry group 
GetDirectoryEntry(results[0].Path);


        object 
members group.Invoke("Members",null);

        foreach 
object member in (IEnumerable) members){


            DirectoryEntry x 
= new DirectoryEntry(member);

            if 
(x.Name! deUser.Name){

                isGroupMember 
= false;

            
}


else{

                isGroupMember 
= true;

                break;

            
}

        }


if (!isGroupMember){


            group.Invoke(
"Add"new object[] {deUser.Path.ToString()});

        
}


        group.Close()
;

    
}


return;

}


9. Generate a mailbox for a user in Microsoft Exchange Server


You might need to create a mailbox for a user in Microsoft Exchange Server. Network configuration and server architecture can add complexity to the process of programmatically creating mailboxes for users, but you know, there’s always a workaround. You can invoke a script that creates mailboxes from a remote machine. I will walk you through the steps I followed to create a mailbox for a user in Microsoft Exchange Server.


  1. On the Domain Controller server, create the directory C:\TestRemoteMailbox.


  2. Copy the script Mailbox.vbs to the directory C:\TestRemoteMailbox.


    Note: Mailbox.vbs is a script that creates MailBoxes in Microsoft Exchange.


  3. Copy the script WSHControl.vbs to your application directory.


    Note: WSHControl.vbs is a script that invokes the MailBox.vbs script on a remote machine (Domain Controller).


  4. From your application, call and start WSHControl.vbs.

    /// <summary>

    /// Method that calls and starts a WSHControl.vbs

    /// </summary>


    /// <param name="userAlias"></param>

    public void GenerateMailBox(string userAlias){

        StringBuilder mailargs 
    = new StringBuilder();


    mailargs.Append("WSHControl.vbs");

        
    mailargs.Append(" ");

        
    mailargs.Append(userAlias);


    ProcessStartInfo sInfo = new ProcessStartInfo("Wscript.exe",mailargs.ToString());


    sInfo.WindowStyle ProcessWindowStyle.Hidden;;

        
    Process.Start(sInfo);

    }


10. Create a user account


/// <summary>

/// Method that creates a new user account

/// </summary>


/// <param name="employeeID"></param>

/// <param name="name"></param>

/// <param name="login"></param>

/// <param name="email"></param>


/// <param name="group"></param>

public void CreateNewUser(string employeeID, string name, string login, string email, string group){


    Catalog catalog 
= new Catalog();

    
DirectoryEntry de ADHelper.GetDirectoryEntry();


/// 1. Create user account


DirectoryEntries users de.Children;

    
DirectoryEntry newuser users.Add("CN=" + login, "user");


/// 2. Set properties

    
SetProperty(newuser,"employeeID", employeeID);

    
SetProperty(newuser,"givenname", name);


SetProperty(newuser,"SAMAccountName", login);

    
SetProperty(newuser,"userPrincipalName", login);

    
SetProperty(newuser,"mail", email);


newuser.CommitChanges();


/// 3. Set password

    
SetPassword(newuser.Path);

    
newuser.CommitChanges();


/// 4. Enable account            


EnableAccount(newuser);


/// 5. Add user account to groups

    
AddUserToGroup(de,newuser,group);


/// 6. Create a mailbox in Microsoft Exchange    


GenerateMailBox(login);            


newuser.Close();

    
de.Close();

}


11. Disable a user account


/// <summary>

/// Method that disables a user account in the AD and hides user's email from Exchange address lists.


/// </summary>

/// <param name="EmployeeID"></param>

public void DisableAccount(string EmployeeID){

    DirectoryEntry de 
GetDirectoryEntry();


DirectorySearcher ds = new DirectorySearcher(de);

    
ds.Filter "(&(objectCategory=Person)(objectClass=user)(employeeID=" + EmployeeID + "))";


ds.SearchScope SearchScope.Subtree;

    
SearchResult results ds.FindOne();


    if
(results != null){


        DirectoryEntry dey 
GetDirectoryEntry(results.Path);

        int 
val (int)dey.Properties["userAccountControl"].Value;

        
dey.Properties["userAccountControl"].Value val | 0x0002;


dey.Properties["msExchHideFromAddressLists"].Value "TRUE";

        
dey.CommitChanges();

        
dey.Close();

    
}


    de.Close()
;


}


12. Update user account


/// <summary>

/// Method that updates user's properties


/// </summary>

/// <param name="employeeID"></param>

/// <param name="department"></param>

/// <param name="title"></param>


/// <param name="company"></param>

public void ModifyUser(string employeeID, string department, string title, string company){


    DirectoryEntry de 
GetDirectoryEntry();

    
DirectorySearcher ds = new DirectorySearcher(de);

    
ds.Filter "(&(objectCategory=Person)(objectClass=user)(employeeID=" + employeeID + "))";


ds.SearchScope SearchScope.Subtree;

    
SearchResult results ds.FindOne();


    if
(results!=null){


        DirectoryEntry dey 
GetDirectoryEntry(results.Path);

        
SetProperty(dey, "department", department);

        
SetProperty(dey, "title", title);


SetProperty(dey, "company", company);

        
dey.CommitChanges();

        
dey.Close();

    
}


    de.Close()
;


}


13. Validate if a string has a correct email pattern


/// <summary>

/// Method that validates if a string has an email pattern.


/// </summary>

/// <param name="mail"></param>

/// <returns></returns>

public bool IsEmail(string mail){


    Regex mailPattern
 = new Regex(@"\w+([-+.]\w+)*@\w+([-.]\w+)*\.\w+([-.]\w+)*");

    return 
mailPattern.IsMatch(mail);

}


14. Extract a user alias from an email account


/// <summary>

/// Method to extract the alias from an email account.


/// </summary>

/// <param name="mailAddress"></param>

/// <returns></returns>

public string GetAlias(string mailAddress){


if (IsEmail(mailAddress)){

        
return mailAddress.Substring(0,mailAddress.IndexOf("@"));

    
}

    
else{

        
return "";


}

}


15. Format dates to AD date format (AAAAMMDDMMSSSS.0Z)


/// <summary>

/// Method that formats a date in the required format


/// needed (AAAAMMDDMMSSSS.0Z) to compare dates in AD.

/// </summary>

/// <param name="date"></param>


/// <returns>Date in valid format for AD</returns>

public string ToADDateString(DateTime date){

    
string year = date.Year.ToString();


    int 
month = date.Month;

    int 
day = date.Day;


StringBuilder sb = new StringBuilder();


sb.Append(year);

    if 
(month <10){

        sb.Append(
"0");

    
}

    sb.Append(month.ToString())
;


    if 
(day <10){

        sb.Append(
"0");

    
}

    sb.Append(day.ToString())
;

    
sb.Append("000000.0Z");


    return 
sb.ToString();

}


16. Search users


When you use Directory Services, you can accomplish many interesting tasks such as searching and filtering users. The DirectorySearcher object allows you to query the AD. The following sample code queries the AD to search all the user accounts that were modified from a given date. The results are stored in a DataTable, so you can easily databind them.


/// <summary>

/// Method that returns a DataTable with a list of users modified from a given date.


/// </summary>

/// <param name="fromdate"></param>

public DataTable GetModifiedUsers(DateTime fromdate){

    DataTable dt 
= new DataTable();


dt.Columns.Add("EmployeeID");

    
dt.Columns.Add("Name");

    
dt.Columns.Add("Email");


DirectoryEntry de GetDirectoryEntry();


DirectorySearcher ds = new DirectorySearcher(de);


StringBuilder filter = new StringBuilder();

    
filter.Append("(&(objectCategory=Person)(objectClass=user)(whenChanged>=");


filter.Append(date.ToADDateString());

    
filter.Append("))");


ds.Filter=filter.ToString();

    
ds.SearchScope SearchScope.Subtree;


SearchResultCollection resultsds.FindAll();


    foreach
(SearchResult result in results){

        DataRow dr 
dt.NewRow();


DirectoryEntry dey GetDirectoryEntry(result.Path);

        
dr["EmployeeID"dey.Properties["employeeID"].Value;

        
dr["Name"dey.Properties["givenname"].Value;


dr["Email"dey.Properties["mail"].Value;

        
dt.Rows.Add(dr);

        
dey.Close();

    
}


    de.Close()
;

    return 
dt;

}

Get User Group From Active Directory

In order to retrieve the list of users and their groups from Active Directory, we will need to write some .NET code.  The following method shows the steps to write out every user and their group memberships to a tab delimited file:


The main points about the above code are:


  • Step 1 sets up the parameters for the Active Directory search.  DirectoryEntry is a class in the System.DirectoryServices namespace that you use to specify where in Active Directory to begin the search.  In my case I used "LDAP://dc=vs,dc=local" as the path variable value to get all users in the domain since my domain is vs.local.  DirectorySearcher is used to perform the actual search; it is also in the System.DirectoryServices namespace.  The SearchScope property is set to search objects and their hierarchies.  You specify the attributes you want to retrieve by calling the PropertiesToLoad Add method.  The Filter property is set to return any object that represents a person.  The PageSize property sets the chunk size for retrieving items from the Active Directory.  Without specifying a PageSize you will only get the first 1,000 items.

  • Step 2 executes the search by calling the FindAll method on the DirectorySearcher object, which returns a collection of objects.
  • Step 3 creates the flat file to output the results.
  • Step 4 iterates through the result collection.  Each item is a collection itself.
  • Step 5 iterates through each item collection pulling out either a single value (e.g. samaccountname) or multiple values (e.g. memberof).
  • The samaccountname attribute is the user's login name.
  • The memberof attribute is a multi-valued collection which contains each Active Directory group that the user is a member of.
  • The above code is part of a class called User contained in a class library called ADHelper.DLL.  By packaging the code in a class library rather than embedding it in the SSIS package, we can call it from the SSIS package as well as any .NET code.

Note that there are two requirements for deploying the above code so that it can be called from an SSIS package:


  • ADHelper.DLL must be deployed to the Global Assembly Cache (GAC).  You can use the GACUTIL utility to do this or simply drag and drop the DLL to the \Windows\Assembly folder.

  • ADHelper.DLL must be copied to the folder \Program Files\Microsoft SQL Server\90\SDK\Assemblies

SSIS Package Control Flow


We will use the following SSIS package control flow to synchronize our security tables with Active Directory:


Friday, September 3, 2010

How to get all users in an Active Directory Group

public static DataSet GetUsersForGroup(string GroupName)
{
DataSet dsUser = new DataSet();
DirectoryEntry de = GetDirectoryObject();

//create instance fo the direcory searcher
DirectorySearcher deSearch = new DirectorySearcher();

//set the search filter
deSearch.SearchRoot =de;
//deSearch.PropertiesToLoad.Add("cn");
deSearch.Filter = "(&(objectClass=group)(cn=" + GroupName +"))";

//get the group result
SearchResult results= deSearch.FindOne();

//Create a new table object within the dataset
DataTable tbUser = dsUser.Tables.Add("Users");
tbUser.Columns.Add("UserName");
tbUser.Columns.Add("DisplayName");
tbUser.Columns.Add("EMailAddress");

//Create default row
DataRow rwDefaultUser = tbUser.NewRow();
rwDefaultUser ["UserName"]= "0";
rwDefaultUser ["DisplayName"]="(Not Specified)";
rwDefaultUser ["EMailAddress"]="(Not Specified)";
tbUser.Rows.Add(rwDefaultUser);

//if the group is valid, then continue, otherwise return a blank dataset
if(results !=null)
{
//create a link to the group object, so we can get the list of members
//within the group
DirectoryEntry deGroup= new DirectoryEntry(results.Path,ADAdminUser,ADAdminPassword,AuthenticationTypes.Secure);
//assign a property collection
System.DirectoryServices.PropertyCollection pcoll = deGroup.Properties;
int n = pcoll["member"].Count;

//if there are members fo the group, then get the details and assign to the table
for (int l = 0; l < n ; l++)
{
//create a link to the user object sot hat the FirstName, LastName and SUername can be gotten
DirectoryEntry deUser= new DirectoryEntry(ADFullPath + "/" +pcoll["member"][l].ToString(),ADAdminUser,ADAdminPassword,AuthenticationTypes.Secure);

//set a new empty row
DataRow rwUser = tbUser.NewRow();

//populate the column
rwUser["UserName"]= GetProperty(deUser,"cn");
rwUser["DisplayName"]= GetProperty(deUser,"givenName") + " " + GetProperty(deUser,"sn");
rwUser["EMailAddress"]= GetProperty(deUser,"mail");
//append the row to the table of the dataset
tbUser.Rows.Add(rwUser);

//close the directory entry object
deUser.Close();

}
de.Close();
deGroup.Close();
}

return dsUser;
}

Accessing list items using the object model

SPList.Items foreach


This SPListItem Collection works directly against the underlying SharePoint List (SPList). Any updates made against List Items are updated on the server.


The below code shows enumerating through all List Items in a List.


using (SPWeb web = siteCollection.AllWebs["webname"])
{
SPListItemCollection items = web.Lists["Document Library"].Items;
foreach (SPListItem item in items)
{
Console.Write(item.Title);
}
}


---------------------------------------------------------------
using (SPWeb web = siteCollection.AllWebs["webname"])
{
SPList list = web.Lists["Document Library"];
DataTable table = list.GetItems(list.DefaultView).GetDataTable();
//TODO: enumerate DataTable
}

Checking whether SPList Exists

public static bool InspectForList(string listName)
{
var results = SPContext.Current.Web.Lists.Cast().Where(item => Equals(string.Compare(item.Title, listName, true), 0));
return results.Count()> 0;
}
-------------------------------------------------------------
public static bool ListExists(SPWeb web, string listName)
{
return web.Lists.Cast().Any(list => string.Equals(list.Title, listName));
}
------------------------------------------------------------------------------