private void CopyAttachments(SPListItem sourceItem, SPListItem targetItem)
{
try
{
//get the folder with the attachments for the source item
SPFolder sourceItemAttachmentsFolder =
sourceItem.Web.Folders["Lists"].SubFolders[sourceItem.ParentList.Title].SubFolders["Attachments"].SubFolders[sourceItem.ID.ToString()];
//Loop over the attachments, and add them to the target item
foreach (SPFile file in sourceItemAttachmentsFolder.Files)
{
byte[] binFile = file.OpenBinary();
targetItem.Attachments.AddNow(file.Name, binFile);
}
}
catch { }
finally
{
sourceItem.Web.Dispose();
}
}
Monday, December 27, 2010
Accordion
<style>
.accordionHeaderWO
{
border: 1px solid #2F4F4F;
color:#FFF;
background-color: #7D1514;
font-size: 12px;
padding: 5px;
margin-top: 5px;
cursor: pointer;
}
.accordionContent
{
background-color: White;
padding: 5px;
padding-top: 10px;
}
.accordionLink
{
background-color: #D3DEEF;
color: white;
}
<style>
----------------------
<form id="form1" runat="server">
<asp:ScriptManager ID="ScriptManager1" runat="server">
</asp:ScriptManager>
<div>
<cc1:Accordion ID="Accordion1" runat="server" SelectedIndex="0" HeaderCssClass="accordionHeaderWO"
ContentCssClass="accordionContent" FadeTransitions="true" TransitionDuration="250"
FramesPerSecond="40" AutoSize="None" RequireOpenedPane="true">
<Panes>
<cc1:AccordionPane ID="AccordionPane1" runat="server">
<Header> Rejected Vendor Information</Header>
<Content>
<asp:TextBox ID="TextBox3" runat="server"></asp:TextBox>
<asp:TextBox ID="TextBox4" runat="server"></asp:TextBox>
</Content>
</cc1:AccordionPane>
<cc1:AccordionPane ID="AccordionPane2" runat="server">
<Header>
Comments
</Header>
<Content>
<asp:TextBox ID="TextBox1" runat="server"></asp:TextBox>
<asp:TextBox ID="TextBox2" runat="server"></asp:TextBox>
</Content>
</cc1:AccordionPane>
</Panes>
</cc1:Accordion>
</div>
</form>
EncryptionHelper
public class EncryptionHelper
{
# region Function to encrypt QueryString
public static string EncryptText(string pass)
{
return Encrypt(pass, "&%#@?,:*");
}
#endregion
#region EncryptQuery string
///
/// Encrypts a particular string with a specific Key
///
///
///
///
public static string Encrypt(string stringToEncrypt, string encryptionKey)
{
byte[] key = { };
byte[] IV = { 10, 20, 30, 40, 50, 60, 70, 80 };
byte[] inputByteArray; //Convert.ToByte(stringToEncrypt.Length)
try
{
key = Encoding.UTF8.GetBytes(encryptionKey.Substring(0, 8));
DESCryptoServiceProvider des = new DESCryptoServiceProvider();
inputByteArray = Encoding.UTF8.GetBytes(stringToEncrypt);
MemoryStream ms = new MemoryStream();
CryptoStream cs = new CryptoStream(ms, des.CreateEncryptor(key, IV), CryptoStreamMode.Write);
cs.Write(inputByteArray, 0, inputByteArray.Length);
cs.FlushFinalBlock();
return Convert.ToBase64String(ms.ToArray());
}
catch (System.Exception ex)
{
return (string.Empty);
}
}
#endregion
#region Function decrypt Querystring
public static string DecryptText(String pass)
{
return Decrypt(pass, "&%#@?,:*");
}
#endregion
#region Decrypt QueryString
///
/// Decrypts a particular string with a specific Key
///
public static string Decrypt(string stringToDecrypt, string sEncryptionKey)
{
byte[] key = { };
byte[] IV = { 10, 20, 30, 40, 50, 60, 70, 80 };
byte[] inputByteArray = new byte[stringToDecrypt.Length];
try
{
key = Encoding.UTF8.GetBytes(sEncryptionKey.Substring(0, 8));
DESCryptoServiceProvider des = new DESCryptoServiceProvider();
inputByteArray = Convert.FromBase64String(stringToDecrypt);
MemoryStream ms = new MemoryStream();
CryptoStream cs = new CryptoStream(ms, des.CreateDecryptor(key, IV), CryptoStreamMode.Write);
cs.Write(inputByteArray, 0, inputByteArray.Length);
cs.FlushFinalBlock();
Encoding encoding = Encoding.UTF8;
return encoding.GetString(ms.ToArray());
}
catch (System.Exception ex)
{
return (string.Empty);
}
}
#endregion
}
----------------------grid inline-----------
protected string Encode(object objGrid)
{
return Server.UrlEncode(EncryptionHelper.EncryptText(Convert.ToString(objGrid.ToString())));
}
-----------------------------
if (Request.QueryString["Status"] != null && Request.QueryString["EditID"] != null)
{
hdnDecodeWOID.Value = Convert.ToString(Server.UrlDecode(EncryptionHelper.DecryptText(Request.QueryString["EditID"].ToString())));
hdneDecodeStatus.Value = Convert.ToString(Server.UrlDecode(EncryptionHelper.DecryptText(Request.QueryString["Status"].ToString())));
}
-------example--------------------------------------------------
< a href="/Pages/AccountWorkOrderDisplay.aspx?EditID=< %#(Encode(Eval("ID")))%>&Status=<%#(Encode(Eval("Status")))%>&Mailstatus=<%#(Encode(Eval("MailImageStatus")))%>">
{
# region Function to encrypt QueryString
public static string EncryptText(string pass)
{
return Encrypt(pass, "&%#@?,:*");
}
#endregion
#region EncryptQuery string
///
/// Encrypts a particular string with a specific Key
///
///
///
///
public static string Encrypt(string stringToEncrypt, string encryptionKey)
{
byte[] key = { };
byte[] IV = { 10, 20, 30, 40, 50, 60, 70, 80 };
byte[] inputByteArray; //Convert.ToByte(stringToEncrypt.Length)
try
{
key = Encoding.UTF8.GetBytes(encryptionKey.Substring(0, 8));
DESCryptoServiceProvider des = new DESCryptoServiceProvider();
inputByteArray = Encoding.UTF8.GetBytes(stringToEncrypt);
MemoryStream ms = new MemoryStream();
CryptoStream cs = new CryptoStream(ms, des.CreateEncryptor(key, IV), CryptoStreamMode.Write);
cs.Write(inputByteArray, 0, inputByteArray.Length);
cs.FlushFinalBlock();
return Convert.ToBase64String(ms.ToArray());
}
catch (System.Exception ex)
{
return (string.Empty);
}
}
#endregion
#region Function decrypt Querystring
public static string DecryptText(String pass)
{
return Decrypt(pass, "&%#@?,:*");
}
#endregion
#region Decrypt QueryString
///
/// Decrypts a particular string with a specific Key
///
public static string Decrypt(string stringToDecrypt, string sEncryptionKey)
{
byte[] key = { };
byte[] IV = { 10, 20, 30, 40, 50, 60, 70, 80 };
byte[] inputByteArray = new byte[stringToDecrypt.Length];
try
{
key = Encoding.UTF8.GetBytes(sEncryptionKey.Substring(0, 8));
DESCryptoServiceProvider des = new DESCryptoServiceProvider();
inputByteArray = Convert.FromBase64String(stringToDecrypt);
MemoryStream ms = new MemoryStream();
CryptoStream cs = new CryptoStream(ms, des.CreateDecryptor(key, IV), CryptoStreamMode.Write);
cs.Write(inputByteArray, 0, inputByteArray.Length);
cs.FlushFinalBlock();
Encoding encoding = Encoding.UTF8;
return encoding.GetString(ms.ToArray());
}
catch (System.Exception ex)
{
return (string.Empty);
}
}
#endregion
}
----------------------grid inline-----------
protected string Encode(object objGrid)
{
return Server.UrlEncode(EncryptionHelper.EncryptText(Convert.ToString(objGrid.ToString())));
}
-----------------------------
if (Request.QueryString["Status"] != null && Request.QueryString["EditID"] != null)
{
hdnDecodeWOID.Value = Convert.ToString(Server.UrlDecode(EncryptionHelper.DecryptText(Request.QueryString["EditID"].ToString())));
hdneDecodeStatus.Value = Convert.ToString(Server.UrlDecode(EncryptionHelper.DecryptText(Request.QueryString["Status"].ToString())));
}
-------example--------------------------------------------------
< a href="/Pages/AccountWorkOrderDisplay.aspx?EditID=< %#(Encode(Eval("ID")))%>&Status=<%#(Encode(Eval("Status")))%>&Mailstatus=<%#(Encode(Eval("MailImageStatus")))%>">
The security validation for this page is invalid. Click Back in your Web browser.
Sometimes while trying to delete documents or move documents from one library to another we get an error "The security validation for this page is invalid. Click Back in your Web browser, refresh the page, and try your operation again” while trying to move documents from one document library to another document library."
This error is caused due to security validation. So there should be a way out to turn it off. One method to turn off security is:
Central Administration—>application management—->web application general settings–>turn security validation off
But, if we always keep it on there might be danger of malicious code.
So, we should handle this through coding, turn off security validation for our code to execute and then again turn it on.
SPWeb ospWeb = SPContext.Current.Web;
Microsoft.SharePoint.Administration.SPWebApplication webApp = ospWeb.Site.WebApplication;
webApp.FormDigestSettings.Enabled = false;
// our code should be inserted here
webApp.FormDigestSettings.Enabled = true;
Monday, December 20, 2010
SharePoint List Programmatically
Here's the code:
// Instantiate web instances
SPSite sourceSite = new SPSite(@"http://SharePointServer:31001");
SPWeb sourceWeb = sourceSite.RootWeb;
SPSite destSite = new SPSite(@"http://SharePointServer:31002");
SPWeb destWeb = destSite.RootWeb;
// Get a reference to the source list
SPList sourceList = sourceWeb.GetList("/Lists/Announcements");
// if the list exists on the destination site, delete it
try
{
SPList temp = destWeb.Lists[sourceList.Title];
destWeb.Lists.Delete(temp.ID);
}
catch { }
// create new list on the destination web with same properties
Guid newListID = destWeb.Lists.Add(sourceList.Title, sourceList.Description,
sourceList.BaseTemplate);
SPList destList = destWeb.Lists[newListID];
// copy items
foreach (SPListItem item in announcements.Items)
{
SPListItem newDestItem = destList.Items.Add();
foreach (SPField field in sourceList.Fields)
{
if (!field.ReadOnlyField)
newDestItem[field.Id] = item[field.Id];
}
newDestItem.Update();
}
// set quicklaunch settings
destList.OnQuickLaunch = sourceList.OnQuickLaunch;
destList.Update();
IQueryable vs IEnumerable
The primary difference is that the extension methods defined for IQueryable take Expression objects instead of Functional objects, meaning the delegate it receives is an expression tree instead of a method to invoke.
IEnumerable < T > is great for working with in-memory collections, but IQueryable< T > allows for a remote data source, like a database or web service.
IEnumerable doesn’t have the concept of moving between items, it is a forward only collection. It’s very minimalistic; something that most any data source can provide. Using only this minimal functionality, LINQ can provide all of these great operators.
IQueryable<T> is a very powerful feature that enables a variety of interesting deferred execution scenarios (like paging and composition based queries).
IQueryable < Customer > custs = from c in db.Customers
where c.City == "< City >"
select c;
IEnumerable < Customer> custs = from c in db.Customers
where c.City == "< City >"
select c;
Tuesday, November 30, 2010
Gridview RowCommand
< asp:LinkButton runat="server" ID="hl1" CommandName="download" CommandArgument='< %# Eval("Attachment_Path") & "," & Eval("Attachment_FileName") %>'
Text='<%# Eval("Attachment_FileName") %>'>< /asp:LinkButton>
Text='<%# Eval("Attachment_FileName") %>'>< /asp:LinkButton>
Gridview RowCommand
<asp:LinkButton runat="server" ID="hl1" CommandName="download" CommandArgument='< %# Eval("Attachment_Path") & "," & Eval("Attachment_FileName") %>'
Text='<%# Eval("Attachment_FileName") %>'>< /asp:LinkButton>
Text='<%# Eval("Attachment_FileName") %>'>< /asp:LinkButton>
Monday, November 1, 2010
Validate-AjaxFilterExtender
< ajaxToolkit:FilteredTextBoxExtender ID="ftbe" runat="server"
TargetControlID="TextBox3"
FilterType="Custom, Numbers"
ValidChars="+-=/*()." />
TargetControlID="TextBox3"
FilterType="Custom, Numbers"
ValidChars="+-=/*()." />
Validation- CustomValidators:CheckboxList
< script type="text/javascript">
//– To Validate CheckBoxList
function ChequarSelecciondeTipoModificacion(source, args)
{
var chkListaTipoModificaciones= document.getElementById ('<%= CheckBoxList1.ClientID %>');
var chkLista= chkListaTipoModificaciones.getElementsByTagName("input");
for(var i=0;i
if(chkLista[i].checked)
{
args.IsValid = true;
return;
}
}
args.IsValid = false;
}
< /script>
< asp:CheckBoxList ID="CheckBoxList1″ runat="server">
< /asp:CheckBoxList>
< asp:CustomValidator ID="CustomValidator1″ runat="server" ErrorMessage=” " ClientValidationFunction=”ChequarSelecciondeTipoModificacion”>< /asp:CustomValidator>
//– To Validate CheckBoxList
function ChequarSelecciondeTipoModificacion(source, args)
{
var chkListaTipoModificaciones= document.getElementById ('<%= CheckBoxList1.ClientID %>');
var chkLista= chkListaTipoModificaciones.getElementsByTagName("input");
for(var i=0;i
if(chkLista[i].checked)
{
args.IsValid = true;
return;
}
}
args.IsValid = false;
}
< /script>
< asp:CheckBoxList ID="CheckBoxList1″ runat="server">
< /asp:CheckBoxList>
< asp:CustomValidator ID="CustomValidator1″ runat="server" ErrorMessage=”
" ClientValidationFunction=”ChequarSelecciondeTipoModificacion”>< /asp:CustomValidator>
Thursday, October 28, 2010
RadioButtonList-SelectedIndex
RadioButtonList1.SelectedIndex = RadioButtonList1.Items.IndexOf(RadioButtonList1.Items.FindByText("MyOption"))
Wednesday, October 13, 2010
Abstract vs Interface
An Interface cannot implement methods.
An abstract class can implement methods.
An Interface can only inherit from another Interface.
An abstract class can inherit from a class and one or more interfaces.
An Interface cannot contain fields.
An abstract class can contain fields.
An Interface can contain property definitions.
An abstract class can implement a property.
An Interface cannot contain constructors or destructors.
An abstract class can contain constructors or destructors.
An Interface can be inherited from by structures.
An abstract class cannot be inherited from by structures.
An Interface can support multiple inheritance.
An abstract class cannot support multiple inheritance.
Monday, October 11, 2010
JavaScript - MouseOver Image
< script language="javascript">
function PopupCenter(pageURL, title,w,h) {
var left = (screen.width/2)-(w/2);
var top = (screen.height/2)-(h/2);
var targetWin = window.open (pageURL, title, 'toolbar=no, location=no, directories=no, status=no, menubar=no, scrollbars=no, resizable=no, copyhistory=no, width='+w+', height='+h+', top='+top+', left='+left);
}
function close_window()
{
my_window.close();
}
< /script>
-------------------------------------
< a href="#"> < img src="../Images/sun-flower-white.jpg" onMouseOver="PopupCenter('../Images/sun-flower-white.jpg','test',500,500)" id="image1" width="200" height="150" alt="test" /> </a >
Friday, October 8, 2010
Sharepoint - GetListItems
public DataTable GetListItems()
{
SPSite spSite = new SPSite("http://larMOSS/properties/Lists/Property%20List/");
SPWeb spWeb = spSite.OpenWeb();
SPList spList = spWeb.Lists["Property List"];
DataTable dt = spList.Items.GetDataTable();
DataTable newdt;
if (dt != null)
{
DataView dv = new DataView(dt);
dv.RowFilter = "Status = 'Active'"; //condition like where clause
string[] st = { "Title", "Owner", "Status" };
newdt = dv.ToTable(False, st);
}
dt = null;
spList = null;
spWeb = null;
spSite = null;
return newdt;
}
{
SPSite spSite = new SPSite("http://larMOSS/properties/Lists/Property%20List/");
SPWeb spWeb = spSite.OpenWeb();
SPList spList = spWeb.Lists["Property List"];
DataTable dt = spList.Items.GetDataTable();
DataTable newdt;
if (dt != null)
{
DataView dv = new DataView(dt);
dv.RowFilter = "Status = 'Active'"; //condition like where clause
string[] st = { "Title", "Owner", "Status" };
newdt = dv.ToTable(False, st);
}
dt = null;
spList = null;
spWeb = null;
spSite = null;
return newdt;
}
Thursday, October 7, 2010
Sharepoint - SPSiteDataQuery
public static DataTable GetNames()
{
// retrieve the reference to the site where the Web part is on
SPWeb web = SPContext.Current.Web;
// retrieve all the different types of beers via a CAML query
SPSiteDataQuery qry = new SPSiteDataQuery();
qry.Query = "< OrderBy>
qry.ViewFields = "< FieldRef Name='Type' />";
qry.Lists = "< Lists ServerTemplate='100' />";
qry.Webs = "< Web Scope='Recursive' />";
// -- execute the query
DataTable dt = web.GetSiteData(qry);
return dt;
}
Validation - DropdwonList(asp.net)
------------Script---------------------------
< script type="text/javascript">
function Validateddl(source, args) {
var str = TrimSpaces(args.Value);
if (str == "--Select--") {
args.IsValid = false;
return;
}
args.IsValid = true;
}
< /script>
------ Example------------------------------------------------------------
< asp:DropDownList ID="ddlCreatorGroup" runat="server" CssClass="dropdown">
< /asp:DropDownList >
< asp:CustomValidator ID="CustoddmValidator2" ClientValidationFunction="Validateddl" Display="Dynamic" ControlToValidate="ddlCreatorGroup" runat="server"
ErrorMessage="Please select creator group"> < /asp:CustomValidator >
c# - MulitDimensionla Array With Foreach
Example with a Rectangular Array
The following example shows the foreach statement used with a rectangular array:
class Sample
   {
      static void Main()

      {
         int nTotal = 0;
         int[,] arr1 = { {10, 11}, {12, 13} };


         foreach( int element in arr1 )
         {
            nTotal += element;
            Console.WriteLine

               ("Element: {0}, Current Total: {1}",
                  element, nTotal);
         }
      }
   }
The output is the following:
Element: 10, Current Total: 10Element: 11, Current Total: 21Element: 12, Current Total: 33Element: 13, Current Total: 46
C#-Working with Arrays in .NET
Tutorial
This tutorial is divided into the following sections:
- Arrays in General
- Declaring Arrays
- Initializing Arrays
- Accessing Array Members
- Arrays are Objects
- Using foreach with Arrays
Arrays in General
C# arrays are zero indexed; that is, the array indexes start at zero. Arrays in C# work similarly to how arrays work in most other popular languages There are, however, a few differences that you should be aware of.
When declaring an array, the square brackets ([]) must come after the type, not the identifier. Placing the brackets after the identifier is not legal syntax in C#.
Another detail is that the size of the array is not part of its type as it is in the C language. This allows you to declare an array and assign any array of int objects to it, regardless of the array's length.
int[] numbers; // declare numbers as an int array of any size
numbers = new int[10];  // numbers is a 10-element array
numbers = new int[20];  // now it's a 20-element array
Declaring Arrays
C# supports single-dimensional arrays, multidimensional arrays (rectangular arrays), and array-of-arrays (jagged arrays). The following examples show how to declare different kinds of arrays:
Single-dimensional arrays:
Multidimensional arrays:
Array-of-arrays (jagged):
Declaring them (as shown above) does not actually create the arrays. In C#, arrays are objects (discussed later in this tutorial) and must be instantiated. The following examples show how to create arrays:
Single-dimensional arrays:
Multidimensional arrays:
Array-of-arrays (jagged):
You can also have larger arrays. For example, you can have a three-dimensional rectangular array:
You can even mix rectangular and jagged arrays. For example, the following code declares a single-dimensional array of three-dimensional arrays of two-dimensional arrays of type int:
Example
The following is a complete C# program that declares and instantiates arrays as discussed above.
// arrays.cs
using System;
class DeclareArraysSample
{
    public static void Main()
    {
        // Single-dimensional array
        int[] numbers = new int[5];

        // Multidimensional array
        string[,] names = new string[5,4];

        // Array-of-arrays (jagged array)
        byte[][] scores = new byte[5][];

        // Create the jagged array
        for (int i = 0; i < scores.Length; i++)
        {
            scores[i] = new byte[i+3];
        }

        // Print length of each row
        for (int i = 0; i < scores.Length; i++)
        {
            Console.WriteLine("Length of row {0} is {1}", i, scores[i].Length);
        }
    }
}
Output
Length of row 0 is 3
Length of row 1 is 4
Length of row 2 is 5
Length of row 3 is 6
Length of row 4 is 7
Initializing Arrays
C# provides simple and straightforward ways to initialize arrays at declaration time by enclosing the initial values in curly braces ({}). The following examples show different ways to initialize different kinds of arrays.
Note If you do not initialize an array at the time of declaration, the array members are automatically initialized to the default initial value for the array type. Also, if you declare the array as a field of a type, it will be set to the default value null when you instantiate the type.
Single-Dimensional Array
int[] numbers = new int[5] {1, 2, 3, 4, 5};
string[] names = new string[3] {"Matt", "Joanne", "Robert"};
You can omit the size of the array, like this:
int[] numbers = new int[] {1, 2, 3, 4, 5};
string[] names = new string[] {"Matt", "Joanne", "Robert"};
You can also omit the newoperator if an initializer is provided, like this:
Multidimensional Array
int[,] numbers = new int[3, 2] { {1, 2}, {3, 4}, {5, 6} };
string[,] siblings = new string[2, 2] { {"Mike","Amy"}, {"Mary","Albert"} };
You can omit the size of the array, like this:
int[,] numbers = new int[,] { {1, 2}, {3, 4}, {5, 6} };
string[,] siblings = new string[,] { {"Mike","Amy"}, {"Mary","Albert"} };
You can also omit the newoperator if an initializer is provided, like this:
int[,] numbers = { {1, 2}, {3, 4}, {5, 6} };
string[,] siblings = { {"Mike", "Amy"}, {"Mary", "Albert"} };
Jagged Array (Array-of-Arrays)
You can initialize jagged arrays like this example:
You can also omit the size of the first array, like this:
-or-
Notice that there is no initialization syntax for the elements of a jagged array.
Accessing Array Members
Accessing array members is straightforward and similar to how you access array members in C/C++. For example, the following code creates an array called numbers and then assigns a 5 to the fifth element of the array:
The following code declares a multidimensional array and assigns 5 to the member located at [1, 1]:
The following is a declaration of a single-dimension jagged array that contains two elements. The first element is an array of two integers, and the second is an array of three integers:
The following statements assign 58 to the first element of the first array and 667 to the second element of the second array:
Arrays are Objects
In C#, arrays are actually objects. System.Array is the abstract base type of all array types. You can use the properties, and other class members, that System.Array has. An example of this would be using the Lengthproperty to get the length of an array. The following code assigns the length of the numbers array, which is 5, to a variable called LengthOfNumbers:
The System.Array class provides many other useful methods/properties, such as methods for sorting, searching, and copying arrays.
Using foreach on Arrays
C# also provides the foreach statement. This statement provides a simple, clean way to iterate through the elements of an array. For example, the following code creates an array called numbers and iterates through it with the foreach statement:
int[] numbers = {4, 5, 6, 1, 2, 3, -2, -1, 0};
foreach (int i in numbers)
{
   System.Console.WriteLine(i);
}
With multidimensional arrays, you can use the same method to iterate through the elements, for example:
int[,] numbers = new int[3, 2] {{9, 99}, {3, 33}, {5, 55}};
foreach(int i in numbers)
{
   Console.Write("{0} ", i);
}
The output of this example is:
However, with multidimensional arrays, using a nested for loop gives you more control over the array elements.
Wednesday, October 6, 2010
Sharepoint -How to get Data from Active Directory using C#
How to get Data from Active Directory using C#
Today, I am going to discuss how to fetch data from active directory and how to store it into a clas..
We can access LDAP or AD by using two class: DirectoryEntry and DirectorySearcher
Step 1:
Add reference to System.DirectoryServices amd import it in the code by entering using System.DirectoryServices;
Step 2:
We need the AD Location, AD Userid and AD Password in order to read data from it.
We store these values in web.config:
< appSettings>
< add key="GaadLocation" value="LDAP://XXXXX:XXX"/>
< add key="GaadUserName" value="XXXXXX"/>
< add key="GaadPassword" value="XXXXXX"/>
< /appSettings>
Step 3:
In order to store the data fetched from AD, we created a class and defined some properties.
public class ADContact
{
public string UniqueId {get; set; }
public string LastName { get; set; }
public string DepartmentNumber { get; set; }
public string EmployeeType { get; set; }
public string TelephoneNumber { get; set; }
public string FirstName { get; set; }
public string UserStatus { get; set; }
public string Mail { get; set; }
public string Mobile { get; set; }
public string Title {get; set; }
}
Step 4: Create a method that will return a datatable so that we can iterate through the result.
public List GetADContacts(string SirName, string GivenName, string UniqueId)
{}
Step 5:
Within the method, create a SearchResultCollection object , a datatable, and list of AD properties to access:
SearchResultCollection results = null;
List GaadData = new List();
string ADLocation, ADUserId, ADUserPassword = string.Empty;
#region List of AD Properties
string[] properties = new string[]
{
"modifyTimestamp",
"uid",
"sn",
"departmentNumber",
"facsimileTelephoneNumber",
"givenName",
"mail"
};
#endregion
Step 6:
Declare a try-catch block and within try- write the following code:
try {
string strfilter = string.Empty;
//Get AD Settings from web.config
ADLocation = ConfigurationManager.AppSettings["ADLocation"];
ADUserId = ConfigurationManager.AppSettings["ADUserName"];
ADUserPassword = ConfigurationManager.AppSettings["ADPassword"];
//Create an instance of DirectoryEntry by passing the setting valies)
DirectoryEntry root = new DirectoryEntry(ADLocation, ADUserId, ADUserPassword, AuthenticationTypes.FastBind);
//Create the filter string : we need to search the Ad for people matching the search criteria. Here we are passing three parameters: SirName, GivenName, Uid. If any field is blank, we are putting * there. that is to get all values
strfilter = String.Format(
"(&(&(sn={0})(givenname={1})(uid={2})))",
String.IsNullOrEmpty(SirName) ? "*" : SirName + "*",
String.IsNullOrEmpty(GivenName) ? "*" : GivenName + "*",
String.IsNullOrEmpty(UniqueId) ? "*" : UniqueId + "*");
if (strfilter != "")
{
DirectorySearcher searcher = new DirectorySearcher(root, strfilter, properties);
searcher.Asynchronous = true;
searcher.SearchScope = SearchScope.Subtree;
results = searcher.FindAll();
}
foreach (SearchResult result in results)
{
ADContact contact = new ADContact();
if (result.Properties["uid"].Count > 0)
contact.UniqueId= Convert.ToString(result.Properties["uid"][0]);
if (result.Properties["title"].Count > 0)
contact.Title = Convert.ToString(result.Properties["title"][0]);
if (result.Properties["sn"].Count > 0)
contact.LastName = Convert.ToString(result.Properties["sn"][0]);
if (result.Properties["givenName"].Count > 0)
contact.FirstName = Convert.ToString(result.Properties["givenName"][0]);
if (result.Properties["facsimileTelephoneNumber"].Count > 0)
contact.TelephoneNumber = Convert.ToString(result.Properties["facsimileTelephoneNumber"][0]);
if (result.Properties["mobile"].Count > 0)
contact.Mobile = Convert.ToString(result.Properties["mobile"][0]);
if (result.Properties["mail"].Count > 0)
contact.Mail = Convert.ToString(result.Properties["mail"][0]);
ADData.Add(contact);
}
return ADData;
}
catch (Exception ex)
{
throw ex;
}
Interview
01. Tell me about your education background, work profile.
02. Is dot net object oriented?
Here I said 'YES'..so next question
Lets start with OOPS
------OOPS------------
03. What is an abstract class?
04. What is an interface?
05. What is the difference between abstract class and an interface?
06. When to use what (abstract/interface)?
07. Give practical scenario regarding usage.
08. What is the relation between virtual and override keyword?
09. What is Polymorphism?
10. What is method overloading and method overriding?
11. What is singleton class?
12. When to use singleton class?
13. Any class in dot net framework that is an example of singleton class?
14. What is inheritance?
-------------------------
------SHAREPOINT-------------
You have worked on SharePoint also....YES
SharePoint coding or just Out-Of-Box? ... Coding
15. What is a web part?
16. Advantage of web part?
17. How to deploy a web part..step by step
18. What is the command line utility used in SharePoint?
19. How you can implement List Item listener?
20. Scenario: You need to check before inserting an item to list that whether the EmpID( field) is unique or not? How will you implement?
21. How will you deploy a feature?
-------------------------
-------Database-----------
22. What is an index?
23. How many types of index are there?
24. How many index I can have on a table? Any max limit?
25. What is difference between a primary key and unique key?
26. What are constraints?
27. Name any constraint?
28. Scenario: Table: EMPID, EMPDEPT, SALARY. You need to restrict that one can insert a row where salary is less than 5000. How will you implement that?
29. What is trigger and of how many types?
30. Have you worked on cursors?..I said no..that's why no further questions
---------------------------
--------DOT NET-----------
31. What are attributes in dot net?
32. Can we define user defined attributes?..IF yes then How?
33. How web service communicates between two non-compatible platforms?
34. Can web service preserve state? How?
35. What is singleton web service?
36. When we add a class file, what remains the default assess modifier?
37. Difference between protected internal, protected ?
38. What is MVC?
39. How will you relate MVC with 3-tier architecture?
--------------------------
-------Process Oriented----------
40. Can you name and explain any design pattern with example
41. Have you ever used any defect analysis?
42. What type of proceed flow you use?
43. Have you ever designed design document?
44. What are the main parts of a design document?
45. What tool you used in order to draw class diagrams?
46. Any idea regarding UML?
Sharepoint -Check SPGroup
public bool isGroupExist(string groupName)
{
SPSite _objSite;
SPWeb _objWeb;
bool flag = true;
string _siteUrl = SPContext.Current.Site.Url;
SPSecurity.RunWithElevatedPrivileges(delegate()
{
using (_objSite = new SPSite(_siteUrl))
{
using (_objWeb = _objSite.OpenWeb())
{
if (_objWeb.SiteGroups.Cast().Any(g => string.Compare(g.Name, groupName, true) == 0))
{
flag = false;
}
}
}
}); return flag;
}
{
SPSite _objSite;
SPWeb _objWeb;
bool flag = true;
string _siteUrl = SPContext.Current.Site.Url;
SPSecurity.RunWithElevatedPrivileges(delegate()
{
using (_objSite = new SPSite(_siteUrl))
{
using (_objWeb = _objSite.OpenWeb())
{
if (_objWeb.SiteGroups.Cast
{
flag = false;
}
}
}
}); return flag;
}
Sharepoint - update SPGroupName
using (SPWeb oWebsite = SPContext.Current.Site.RootWeb)
{
SPGroup oGroup = oWebsite.SiteGroups["Original_Name"];
oGroup.Name = "New_Name";
oGroup.Owner = oWebsite.Users["Domain_Name\\User"];
oGroup.Description = "Description";
oGroup.Update();
}
{
SPGroup oGroup = oWebsite.SiteGroups["Original_Name"];
oGroup.Name = "New_Name";
oGroup.Owner = oWebsite.Users["Domain_Name\\User"];
oGroup.Description = "Description";
oGroup.Update();
}
Monday, October 4, 2010
How to Create Custom SharePoint Groups from Features
How to Create Custom SharePoint Groups from Features
While developing SharePoint Features, you may want to create a Custom SharePoint Group as part of the feature. Some common scenarios might include:
* features that create workflows requiring specific groups for approvers
* features that create custom libraries or list which only specific users(groups) should be able to access
* features with custom application pages that provide specific functionality based on group membership
The list goes on and on; and while you could let the site owners create these groups and assign the necessary permissions (for most of these scenarios); wouldn't it be safer if this was done by you. Think of all the time you'll save on calls where you would otherwise have to explain how to do this, or troubleshooting where they've gone wrong. True, they'll still have to add the users to the groups; but if they cant even do that maybe their place shouldn't be anywhere near SharePoint.
In this posting I hope to demonstrate just how to do this by developing a feature that creates a Custom Group when activated.
We'll begin by creating a folder called "CustomGroup" in the SharePoint feature directory (ie. "c:\program files\common files\Microsoft Shared\Web Server Extensions\12\TEMPLATE\FEATUES\CustomGroup")
Next we'll create the FEATURE.xml file, it should look as follows:
Description="This Feature Creates a Custom Group"
Version="12.0.0.0"
Hidden="FALSE"
Scope="Site"
DefaultResourceFile="core"
ReceiverAssembly="CustomGroupFeature, Version=1.0.0.0,
Culture=neutral, PublicKeyToken=TBD"
ReceiverClass="CustomGroupFeature.FeatureReceiver"
xmlns="http://schemas.microsoft.com/sharepoint/">
Notice the ResourceAssembly and ReceiverClass attributes. These serve as references to the assembly that will handle the FeatureActivated, FeatureDeactivating, FeatureInstalled and FeatureUninstalling events. The PublicKeyToken of the ReceiverAssembly attribute has been set to TBD, we wont have this until we've created and compiled the class.
Next we'll create the SPFeatureReceiver class referenced above. Your code should look as follows:
using System;
using System.Collections.Generic;
using System.Text;
using Microsoft.SharePoint;
namespace CustomGroupFeature
{
class FeatureReceiver : SPFeatureReceiver
{
public override void FeatureActivated(SPFeatureReceiverProperties properties)
{
//get a reference to the site collection where the feature is activated
using (SPSite site = properties.Feature.Parent as SPSite)
{
//get a reference to the root site / web of the site collection
using (SPWeb web = site.RootWeb)
{
//get a reference to a Site Owner
//(there should always be at least 1; position 0 of the
//Administrators UserCollection)
//we'll make this user the owner of the custom group
SPMember siteOwner = web.SiteAdministrators[0];
//prepare the group name
string grpName = "Custom Group";
//check if group exists
bool grpExists = false;
//-----------------------------------------------------
//THIS CODE SHOULD BE MOVED TO ITS OWN HELPER FUNCTION
//OR UTILITIES CLASS. IN FACT MOST OF THIS CODE NEEDS
//TO BE REFACTORED
foreach (SPGroup group in web.SiteGroups)
if (group.Name.ToLower() == grpName.ToLower())
grpExists = true;
//------------------------------------------------------
//add the custom group to the site
//if it doesnt allready exist
if (!grpExists)
{
web.SiteGroups.Add(grpName, siteOwner, null,
"Custom Group that I created because I can!");
web.Update();
//get a reference to the group we just created
SPGroup customGroup = web.SiteGroups[grpName];
//add the group to the quicklaunch
web.Properties["vti_associategroups"] =
web.Properties["vti_associategroups"] + ";"
+ customGroup.ID.ToString();
web.Properties.Update();
}
}
}
}
//.....FeatureDeactivating, FeatureInstalled, and FeatureUninstalling methods
}
The code has enough comments to be self explanatory. Make sure you create your class under the right namespace, as this is referenced in the FEATURE.xml file. You'll also need to sign the assembly (give it a strong name), go to http://msdn2.microsoft.com/en-us/library/ms247123(VS.80).aspx for step-by-step instructions on how to do this.
Compile the assembly and add it to the GAC. While in the GAC,right click the assembly, select properties and make a note of the Public Key Token. You'll need to update it on the FEATURE.xml file.
Deploy your feature via the Installfeature command in STSADM or by packaging it and deploying it in a WSP file.
Since we've set the scope of the feature to "Site"; you'll have to activate your feature from the "Site Collection Features" link on the Site Settings page. If you are on a sub-site/web you'll need to click on the "Go to top level site settings" link first.
Friday, October 1, 2010
InfoPath-Publish your InfoPath form to SharePoint Example
How to... Publish your InfoPath form to SharePoint – A series of Forms and SharePoint-ing
In this article I’d like to introduce you to the basics of a step by step approach to publishing your InfoPath forms to SharePoint – it is intended for entry users.
In this article I’d like to introduce you to the basics of a step by step approach to publishing your InfoPath forms to SharePoint – it is intended for entry users.
First things first – your environment configuration
Windows Server 2008 SE
Office SharePoint 2007 (SP1)
Microsoft SQL Server 2005 (SP2)
Microsoft Office InfoPath 2007 (Office 2007 SP1)
A quick overview
We are trying to establish here is to create an InfoPath HR form that will opened as a template from a library within a web browser and then submitting to the forms library with the form fields as library columns. The XSN form will be a custom content type.
Let’s start off by configuring our SharePoint list and environment before we get into the InfoPath form. I will ultimately create two form libraries. One will house my XSN and the other is the library I will have all new forms submitted to.
1) Create a new SharePoint site [Site Actions, Create Site]
2) Now we need to create a Form Library to store my source XSN files, I’ve called mine “Source InfoPath Forms”. The reason is to secure my source library and allow a group of authors that can change or create new InfoPath Forms.

3) I’ll create another Forms Library with the same settings above and call it “Human Resources Recruits”.
4) Then configure the “Human Resources Recruits” library settings
a. Open the Human Resources Recruits library click Settings | Form Library Settings
b. Now click on Advanced settings found under General Settings
c. Make sure you change the option to allow management of contents type to Yes. This will allow you to create a library content type from your InfoPath Form.
d. Also make sure your Browser enabled Documents are set to Open as a Web Page. You’ll want your new forms to open in the browser. Remember that InfoPath form services don’t require you end-users to have the InfoPath client installed on their workstations.

5) Before we continue, I’d like to bring your attention to the default columns for the Human Resources Recruits library:

We’ll publish additional columns from InfoPath a little later.
6) Great. We have now created the two libraries and configured SharePoint to get our solution off the ground. Next, we’ll dive into InfoPath. So this is a good time to open up your Microsoft InfoPath 2007 client on your computer.
7) From the “Getting Started” window in InfoPath, click on “Design a Form Template”, then use the “Blank” form template and ensure you tick the “Enable Browser-compatible features only” check box.
InfoPath offers many rich client side features that you can add to your forms. However, we are requesting SharePoint and the Forms server to do its magic and hence, have some features are disabled for the browser functionality.
8) I’ve created a very basic form with a couple of fields that my HR Manager will need to complete for the interview process using the controls. I’ve saved my form as the HRRecruitsTemplate.xsn (download it here if you wish).

9) Now for the publishing part. From InfoPath, click on “Tools”, “Submit Options” and configure the submit options as below:

Before clicking OK, we need to setup a data connection. My Document library is the library I will store all new recruits forms. Now I’m using the InfoPath form to capture the “metatdata” for my library so my filename will be simple as I’m going to use grouping options in SharePoint to configure my library according to my users needs. Ie. A different view for the Senior Manager and another for the Recruitment Officer who completes these forms.
You’ll also notice that my URL to the library

Click “Next” and provide a name for this data source.
Click “Ok” on the “Submit Options” window.
10) Cool – so now we have setup the location to where all submitted forms will go.
11) Now let’s configure some “Form Options” before we publish. Again, click “Tools” on your menu and “Form Options”
12) Under the “Browser” Category, I’ve selected to show my InfoPath Services toolbar on the top of the page as well as the bottom. I also only need “Submit” and “Close” for the purposes of this form. I don’t need save options as I’ve already configured the format of my name when a user submits the form.
13) Next, I’m going to extend some fields that I defined in the form to the SharePoint columns as “Property Promotions”.

You’ll find I’ve added a few fields I’d like to map to SharePoint (you can also do this process when you’re publishing your form later in this article).
14) Finally, we’re ready to publish this form to SharePoint. Click on “File” and “Publish”
We’re now presented with the “Publishing Wizard”. Select “To a SharePoint server with or without InfoPath Forms Services”. Remember earlier, we created another library where i called mine “Source InfoPath Forms”. This is where we going to publish our source to.
Click “Next” and input the location of our SharePoint or InfoPath Forms Services site.
Mine is

Click “Next”
15) I’ve already prepared my SharePoint library to allow “Management of Content types” in an earlier step, so now I have the ability to publish my Form as a Site Content Type. The advantages of this is I have the columns in the SharePoint library as promoted fields – so I can start to get inventive around my grouping and sorting, perhaps some calculations etc. Maybe apply a workflow to the Content Type “HR Recruitment Form” – these options are all available.

Click “Next”
16) In the next step of the wizard, we are asked if we want to create this as new or update. Since this is our first version of the form – I recommend “Create a new content type”. Any iterations of the form you can use the “update” function.
Click “Next” and give your content type and “Name” and “Description” and click “Next”.
17) The wizard will request a location and name for the form template. I’m going to keep my XSN templates in the Source location on SharePoint and Here is my location and name: http://marclenferna/sandbox/Source%20InfoPath%20Forms/HRRecruitsTemplate.xsn.

Click “Next”
18) (We’re getting close) Next, we have our form Property fields that will be available in SharePoint as columns. You can click “Next” here as we’ve already set them up earlier.
19) Finally a verification screen some our settings:

Click “Publish” – Finally
It will now save your InfoPath XSN file, create the content type, configure our destination library in SharePoint

20) Navigate to our Source InfoPath Forms library. Voila – we have our XSN form. Its not at all needed for our Form Content Type to work but a super place to keep all your forms together.

21) Now back to the “Human Resource Recruits” library. Notice that there is a new form Content Type when you click the drop down arrow next to “New”

Pretty neat huh! Ok – so let’s do some housekeeping and polish this library up.
22) Click “Settings” and “Form Library Settings” and notice a whole new bunch of new Columns available – all from the InfoPath form we published as a Content Type. Remember this is a site content type and can be found along with your other site content types. All CType features and settings apply! So add a workflow associated to this content type is also possible.

23) Back to the Forms Library Settings

I’ll remove the Content Type labelled “Form”, click on Change new button order and default content type; I unchecked Form as a visible content type.
I’ll also modify the “All Documents” view to group according to Interview Date Surname, I’ve added some of the column fields to the view, structured some totalling to get the view similar to the diagram below:
So my library looks like this:

Click the Candidate Recruitment Interview and you presented with our InfoPath web form.

After we submit a form, we get a Thanks popup that essentially means we’re good and our item is captured into the library.
With a bit of data population, you get:

Thats it folks. Oh by the way, you could embed that form in Office Outlook or as an attachment and still have users click the submit button and populate your SharePoint list. So web, email or file share. All works!
Happy SharePointing, Forms Services, InfoPathing :)
Thursday, September 30, 2010
InfoPath - Hide Textbox
InfoPath Basics - Display text box if user selects Other using conditional formatting
Promote two fields to a single SharePoint or Database column/field.
This article demonstrates how to configure an InfoPath form to display an optional text box for the user to enter a custom value if not available from the list of options. A separate field in the main data source of the InfoPath form will be used to store the value of the selected option, or the custom value if supplied by the user. Rules are set up to set the value of the separate field in the data source when an option is selected or when a custom value is entered into the text box. When submitting the form, the text field with either the value selected, or the optional text input entered if the user selects other can be promoted to a single SharePoint column, or database table instead of promoting both the option field and the text field containing the "Other" value if selected.
Conditional formatting is also used to hide the text box until the user selects "Other" from the list of options.
Process:
Set up the Initial InfoPath Form
1. Design a new form template using InfoPath 2003 or 2007
2. From the Task Pane (CTRL+F1), open the Controls toolbar
3. Double click, or drag an Option Button control onto the default view of the form template. Enter the number of options required (remember to add an additional option for "Other").
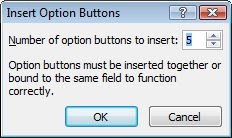
> Note: In this example, the Option Button will have 5 options including "Other". The name of this field in the Main Data Source will be "Options"
4. Right Click the first Option and select "Option Button Properties..."
5. Enter a Field Name for the field. Note: You only need to set the field name on one of the options for it to be applied to all.
6. Enter the value which will be used when this option is selected for the "Value when selected".
7. Press Ok
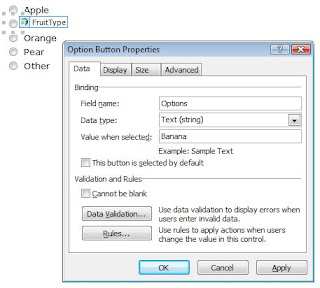
8. Repeat Step 6 for each option. Enter "Other" as the value when selected for the final option.
9. Add a text field control to the form template (main data source) for a user to enter a custom value if required.
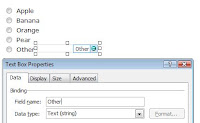
Note: In this example this field will be called "Other".
10. Add a separate text field to the form's Data Source only to store the selected value, or the value from the "Other" field by selecting "Add..." from the menu after right clicking the "myFields" group.
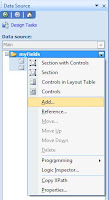
Note: For the purpose of this article, this field will be called "OptionSelected". This field does not need to be added to the form template. This field will contain the selected value from either the "Options" field or the custom value from the "Other" text field if required, and is explained further in the article.
Add Conditional Formatting to hide the "Other" text field when it is not required
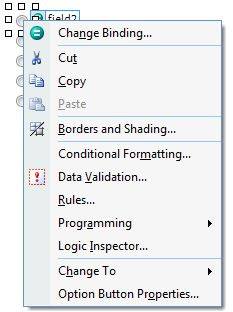
11. Right Click on the "Other" text field control on the form template.
12. Select Conditional Formatting...
13. Press the "Add..." button to add a condition
14. Select the "Options" field created in step 3, "is not equal to" for the condition, and a text value of "Other" to test against (Select "Type text..." from the options).
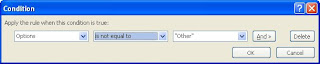
15. Tick the "Hide this control" option for the formatting to be applied.
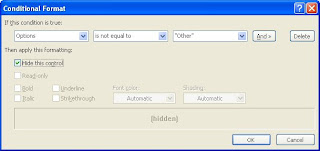
The "Other" text field will now only be visible when the user selects the "Other" option radio button.
Promote two fields to a single SharePoint or Database column/field.
This article demonstrates how to configure an InfoPath form to display an optional text box for the user to enter a custom value if not available from the list of options. A separate field in the main data source of the InfoPath form will be used to store the value of the selected option, or the custom value if supplied by the user. Rules are set up to set the value of the separate field in the data source when an option is selected or when a custom value is entered into the text box. When submitting the form, the text field with either the value selected, or the optional text input entered if the user selects other can be promoted to a single SharePoint column, or database table instead of promoting both the option field and the text field containing the "Other" value if selected.
Conditional formatting is also used to hide the text box until the user selects "Other" from the list of options.
Process:
Set up the Initial InfoPath Form
1. Design a new form template using InfoPath 2003 or 2007
2. From the Task Pane (CTRL+F1), open the Controls toolbar
3. Double click, or drag an Option Button control onto the default view of the form template. Enter the number of options required (remember to add an additional option for "Other").

> Note: In this example, the Option Button will have 5 options including "Other". The name of this field in the Main Data Source will be "Options"
4. Right Click the first Option and select "Option Button Properties..."

5. Enter a Field Name for the field. Note: You only need to set the field name on one of the options for it to be applied to all.
6. Enter the value which will be used when this option is selected for the "Value when selected".
7. Press Ok

8. Repeat Step 6 for each option. Enter "Other" as the value when selected for the final option.
9. Add a text field control to the form template (main data source) for a user to enter a custom value if required.

Note: In this example this field will be called "Other".
10. Add a separate text field to the form's Data Source only to store the selected value, or the value from the "Other" field by selecting "Add..." from the menu after right clicking the "myFields" group.

Note: For the purpose of this article, this field will be called "OptionSelected". This field does not need to be added to the form template. This field will contain the selected value from either the "Options" field or the custom value from the "Other" text field if required, and is explained further in the article.
Add Conditional Formatting to hide the "Other" text field when it is not required
11. Right Click on the "Other" text field control on the form template.
12. Select Conditional Formatting...
13. Press the "Add..." button to add a condition
14. Select the "Options" field created in step 3, "is not equal to" for the condition, and a text value of "Other" to test against (Select "Type text..." from the options).

15. Tick the "Hide this control" option for the formatting to be applied.

The "Other" text field will now only be visible when the user selects the "Other" option radio button.
Saturday, September 25, 2010
Ajax-CalenderExtender
<html>
<head runat="server">
<title>AJAX Calendar Theme</title>
<link href="calendar.css" rel="stylesheet" type="text/css" />
</head>
<body>
<form id="form1" runat="server">
<div>
<asp:ScriptManager ID="ScriptManager1" runat="server">
</asp:ScriptManager>
<ajaxToolkit:CalendarExtender ID="CalendarExtender1" runat="server" CssClass="cal_Theme1"
TargetControlID="TextBox1" PopupPosition="Right">
</ajaxToolkit:CalendarExtender>
</div>
<asp:TextBox ID="TextBox1" runat="server"></asp:TextBox>
</form>
</body>
</html>
Friday, September 24, 2010
Styles-GridRowDataBound
aspx.cs
----------
protected void GridView1_RowDataBound(object sender, GridViewRowEventArgs e)
{
if (e.Row.RowType == DataControlRowType.DataRow)
{
e.Row.Attributes.Add("onmouseover", "this.style.backgroundColor='#94a8b7'");
// This will be the back ground color of the GridView Control
if (e.Row.RowIndex % 2 == 0)
{
e.Row.Attributes.Add("onmouseout", "this.style.backgroundColor='#d0d9e2'");
}
else
{
e.Row.Attributes.Add("onmouseout", "this.style.backgroundColor='#e7ebf0'");
}
}
}
Thursday, September 9, 2010
InfoPath Tip: Working with radio buttons and check boxes
1. This is how form with controls will look like.

Fig 1: Form
2. Add conditional formatting to Section 1 to hide it when Checkbox 1 is checked.

Fig 2: Conditional formatting for Section 1
3. Add conditional formatting to Section 2 to hide it when Checkbox 2 is checked.
4. Add rule to Option 1. By default, the value of Option button 1 is "1" and value of option button 2 is "2". Name rule "Open Section1" and set condition:

Fig 3: Set condition for Rule "Open Section1"
5. After setting the condition, click "Add Action" button to add action. In the "Field", select "Checkbox1" then click the "fx" button to add formula.

Fig 4: Add Action
6. Use "Insert Function" button to add "boolean" function or write it directly in the formula box. Click "Verify Formula" button to verify the formula and then click "OK".

Fig 5: Add Formula
7. You need to add three more rules. The rules are shared between the two radio buttons. Rules established for any of the buttons, both buttons. Add the second rule of "Close Section 2". Set the following condition:

Fig 6: Set condition for rule "Close Section 2"
Add action for this rule. Select "Checkbox1" in "Field" and leave the value blank. This will uncheck the "Checkbox1".
8. Add third rule "Open Section 2" to open the section 2. Condition set: Options is equal to "2" and add the action: "CheckBox2" has a value "Boolean (" true "). Use the technique described above to add formula. Remember, the formula of writing by hand is not set the Boolean value and will be considered as plain text in InfoPath.
9. Add fourth rule "Close Section 1". Add following condition:

Fig 7: Set condition for rule "Close Section 1"
Add following action:

Fig 8: Add action
Select "CheckBox1" in the "field" and uncheck the value. This disables the "CheckBox1". Remember that the sections are associated with those checkboxes. Checking CheckBox1 display section 1 and unchecking that hides in section 1. Similarly, CheckBox2 display control section 2 and unchecking that hides in section 2.
That's all. The point, in short, is that you must set the value of the box to "blank" to disable. Setting it to "False" is not uncheck.
Fig 1: Form
2. Add conditional formatting to Section 1 to hide it when Checkbox 1 is checked.
Fig 2: Conditional formatting for Section 1
3. Add conditional formatting to Section 2 to hide it when Checkbox 2 is checked.
4. Add rule to Option 1. By default, the value of Option button 1 is "1" and value of option button 2 is "2". Name rule "Open Section1" and set condition:
Fig 3: Set condition for Rule "Open Section1"
5. After setting the condition, click "Add Action" button to add action. In the "Field", select "Checkbox1" then click the "fx" button to add formula.
Fig 4: Add Action
6. Use "Insert Function" button to add "boolean" function or write it directly in the formula box. Click "Verify Formula" button to verify the formula and then click "OK".
Fig 5: Add Formula
7. You need to add three more rules. The rules are shared between the two radio buttons. Rules established for any of the buttons, both buttons. Add the second rule of "Close Section 2". Set the following condition:
Fig 6: Set condition for rule "Close Section 2"
Add action for this rule. Select "Checkbox1" in "Field" and leave the value blank. This will uncheck the "Checkbox1".
8. Add third rule "Open Section 2" to open the section 2. Condition set: Options is equal to "2" and add the action: "CheckBox2" has a value "Boolean (" true "). Use the technique described above to add formula. Remember, the formula of writing by hand is not set the Boolean value and will be considered as plain text in InfoPath.
9. Add fourth rule "Close Section 1". Add following condition:
Fig 7: Set condition for rule "Close Section 1"
Add following action:
Fig 8: Add action
Select "CheckBox1" in the "field" and uncheck the value. This disables the "CheckBox1". Remember that the sections are associated with those checkboxes. Checking CheckBox1 display section 1 and unchecking that hides in section 1. Similarly, CheckBox2 display control section 2 and unchecking that hides in section 2.
That's all. The point, in short, is that you must set the value of the box to "blank" to disable. Setting it to "False" is not uncheck.
InfoPath-Automatically change the first letter of a word/sentence to upper case
Problem
When an InfoPath user types in the text "example" or "this is really cool!", you would like this text to
automatically be changed into "Example" or "This is really cool!" when the user leaves the text field.
Solution
Use the concat(), substring(), translate(), and string-length() functions
in a formula to format the text field.
Discussion
You can accomplish this functionality as follows:
- Create a New Blank Form in InfoPath.
- Add a Text Box control to the form.
- Double-click on the text box control to open its Properties dialog box.
- Click on the Insert Formula button behind the Default Value field.
- Enter the following formula on the Insert Formula dialog box:
concat(substring(translate(., "abcdefghijklmnopqrstuvwxyz", "ABCDEFGHIJKLMNOPQRSTUVWXYZ"), 1, 1), substring(., 2, string-length(.) - 1))
- Click on the OK button when closing all open dialog boxes.
The first letter of a word or sentence typed into the text box should now automatically be converted into an upper case letter
whenever the text box loses the focus.
InfoPath-DateDifference without Code
As you all know, DateDiff doesn’t exists in InfoPath, so do we have to do when we want to calculate the number of days between 2 given dates? Tnx Alex Pojidaev’s hto share this with the world
What do we need
- 2 date fields in the datasource, startDate, endDate
- 1 text field dayDifference
Step by Step
- Go to the datasource of your InfoPath Form
- Go to the properties of startDate field, and add a rule
Condition: endDate is not blank
Actions: Set field dayDifference = 0;4096
What do we need
- 2 date fields in the datasource, startDate, endDate
- 1 text field dayDifference
Step by Step
- Go to the datasource of your InfoPath Form
- Go to the properties of startDate field, and add a rule
Condition: endDate is not blank
Actions: Set field dayDifference = 0;4096
- Go to the properties of endDate field, and add a rule
Condition: startDate is not blank
Actions: Set field dayDifference = 0;4096
- Go to the properties of dayDifference field, and add 2 rules
RULE 1
Condition: The Expression : xdDate:AddDays(../my:startDate, substring-before(., “;”)) != ../my:endDate AND
DayDifference contains ;
Actions: Set field dayDifference = concat(substring-before(., “;”) + substring-after(., “;”) * ((translate(addDays
(startDate, substring-before(., “;”)), “-”, “”) < translate(endDate, “-”, “”)) * 2 – 1), “;”, substring-after(., “;”) / 2)
(Don’t forget the select the Edit Xpath checkbox)
RULE 2
Condition: DayDifference contains ;
Actions: Set field dayDifference = substring-before(., “;”)
Your form is ready, it works also in repeating controls.

InfoPath-How to send URL from Infopath to the browser
How to send URL from Infopath to the browser
-----------------------------------------------
System.Diagnostics.Process process = new System.Diagnostics.Process();
process.StartInfo.UseShellExecute = true;
process.StartInfo.FileName = "your custom url";
process.Start();
-----------------------------------------------
System.Diagnostics.Process process = new System.Diagnostics.Process();
process.StartInfo.UseShellExecute = true;
process.StartInfo.FileName = "your custom url";
process.Start();
Saturday, September 4, 2010
Links
http://www.primaryobjects.com/ArticleDirectory.aspx
http://aaphadnis.spaces.live.com/blog/cns!AE185D0790C274B1!193.entry
http://aaphadnis.spaces.live.com/blog/cns!AE185D0790C274B1!193.entry
Using Active Directory to authenticate users to your ASP.NET Web Site.
ASP.NET membership provides the ability to authenticate users to your web application using forms based authentication against a database of users or directory services. This article explains the steps required to provide authentication against Active Directory, either for new sites with no authentication, or for existing sites using database authentication.
Step 1 – Set up the Active Directory connection string
The Active Directory connection string is simliar to the database connection string used in ASP.NET, except that it references an LDAP address. The connection string is specified in the web.config file.
The following string will authenticate users in the entire company.com.au tree:
<connectionStrings>
<add name="ADConnectionString"
connectionString="LDAP://company.com.au/DC=company,DC=com,DC=au"/>
</connectionStrings>
If you want to restrict authentication to a particular OU, then you specify it in the connection string like so:
<connectionStrings>
<add name="ADConnectionString"
connectionString="LDAP://dept.company.com.au/CN=dept,DC=company,DC=com,DC=au"/>
</connectionStrings>
Step 2 – Configure the Membership provider
In your web.config file, create or change the following entry to configure the Membership provider for Active Directory within the <system.web> section:
<membership defaultProvider="MyADMembershipProvider">
<providers>
<add name="MyADMembershipProvider"
type="System.Web.Security.ActiveDirectoryMembershipProvider,
System.Web, Version=2.0.0.0, Culture=neutral,
PublicKeyToken=b03f5f7f11d50a3a"
connectionStringName="ADConnectionString"
attributeMapUsername="sAMAccountName"/>
</providers>
</membership>
The connectionStringName attribute should match the name of the connection string you created in Step 1.
You can configure the credentials used to access Active Directory using the connectionUserName and connectionPassword attributes. If you leave these blank then your application's process identity is used to access Active Directory, regardless of whether your application uses impersonation.
Step 3 – Configure the Authentication and Authorization parameters
In your web.config file, create or change the following entry to configure the authentication and authorization parameters for Active Directory within the <system.web> section:
<authentication mode="Forms">
<forms name=".ADAuthCookie" timeout="43200"/>
</authentication>
<authorization>
<deny users="?"/>
<allow users="*"/>
</authorization>
The authorization settings above require every user to authenticate before accessing your web application. ASP.NET will automatically redirect these users to a Login.aspx page.
Step 4 – Create a Login page
The simplest way of creating the login page (which must be called Login.aspx) is by using the ASP.NET Login control as the following example demonstrates:
<form id="form1" runat="server">
<asp:Login ID="Login1" runat="server">
<LayoutTemplate>
<p>
<asp:TextBox runat="server" ID="Username" />
</p>
<p>
<asp:TextBox runat="server" ID="Password" TextMode="Password" />
</p>
<p>
<asp:CheckBox ID="RememberMe" runat="server" />
</p>
<asp:Button ID="btnLogin" runat="server" CommandName="Login" />
</LayoutTemplate>
</asp:Login>
<br />
<asp:Label ID="lblLoginErrorDetails" runat="server" />
</form>
If you are using the Login control, you MUST name your user name and password text boxes exactly as shown in the example.
The Login control can also provide error checking through the built in LoginError subroutine:
Protected Sub Login1_LoginError(ByVal sender As Object,
ByVal e As System.EventArgs) Handles Login1.LoginError
If Login1.UserName = String.Empty And Login1.Password = String.Empty Then
lblLoginErrorDetails.Text = "Please enter your username and password."
ElseIf Login1.UserName = String.Empty Then
lblLoginErrorDetails.Text = "Please enter your username."
ElseIf Login1.Password = String.Empty Then
lblLoginErrorDetails.Text = "Please enter your password."
Else
Dim userInfo As MembershipUser = Membership.GetUser(Login1.UserName)
LoginError.Visible = "True"
If userInfo Is Nothing Then
lblLoginErrorDetails.Text = "There is no user in the database
with the username " & Login1.UserName & ". Please try again."
Else
If Not userInfo.IsApproved Then
lblLoginErrorDetails.Text = "Your account has not yet been
approved. Please try again later."
ElseIf userInfo.IsLockedOut Then
lblLoginErrorDetails.Text = "Your account has been locked
out due to maximum incorrect login attempts. Please
contact the site administrator."
Else
lblLoginErrorDetails.Text = "Your password is incorrect,
please try again."
End If
End If
End If
End Sub
That’s all you should need to allow your users to log on. This is just the beginning of using Active Directory authentication for your web site, stay tuned for further articles in this series!
ACTIVE DIRECTORY AND .NET
Some time ago I was working in a project where I had to design and develop a service
to synchronize a human resources database with an Active Directory (AD). To accomplish my goal, I created a service that used .NET Directory Services, and after some months, the project succeeded. I had to invest a ton of extra hours to the project because I had a hard time finding sample .NET code and documentation related to specific tasks needed to work with AD User Accounts.
/// <summary>
/// Method used to create an entry to the AD.
/// Replace the path, username, and password.
/// </summary>
/// <returns>DirectoryEntry</returns>
public static DirectoryEntry GetDirectoryEntry(){
DirectoryEntry de = new DirectoryEntry();
de.Path = "LDAP://192.168.1.1/CN=Users;DC=Yourdomain";
de.Username = @"yourdomain\sampleuser";
de.Password = "samplepassword";
return de;
}
/// <summary>
/// Method used to create an entry to the AD using a secure connection.
/// Replace the path.
/// </summary>
/// <returns>DirectoryEntry</returns>
public static DirectoryEntry GetDirectoryEntry(){
DirectoryEntry de = new DirectoryEntry();
de.Path = "LDAP://192.168.1.1/CN=Users;DC=Yourdomain";
de.AuthenticationType = AuthenticationTypes.Secure;
return de;
}
/// <summary>
/// Establish identity (principal) and culture for a thread.
/// </summary>
public static void SetCultureAndIdentity(){
AppDomain.CurrentDomain.SetPrincipalPolicy(PrincipalPolicy.WindowsPrincipal);
WindowsPrincipal principal = (WindowsPrincipal)Thread.CurrentPrincipal;
WindowsIdentity identity = (WindowsIdentity)principal.Identity;
System.Threading.Thread.CurrentThread.CurrentCulture = new CultureInfo("en-US");
}
/// <summary>
/// Method to validate if a user exists in the AD.
/// </summary>
/// <param name="UserName"></param>
/// <returns></returns>
public bool UserExists(string UserName){
DirectoryEntry de = ADHelper.GetDirectoryEntry();
DirectorySearcher deSearch = new DirectorySearcher();
deSearch.SearchRoot =de;
deSearch.Filter = "(&(objectClass=user) (cn=" + UserName +"))";
SearchResultCollection results = deSearch.FindAll();
if(results.Count == 0){
return false;
}
else{
return true;
}
}
/// <summary>
/// Helper method that sets properties for AD users.
/// </summary>
/// <param name="de"></param>
/// <param name="PropertyName"></param>
/// <param name="PropertyValue"></param>
public static void SetProperty(DirectoryEntry de, string PropertyName, string PropertyValue){
if(PropertyValue!=null){
if(de.Properties.Contains(PropertyName)){
de.Properties[PropertyName][0]=PropertyValue;
}
else{
de.Properties[PropertyName].Add(PropertyValue);
}
}
}
// Set the co property using the name of the country.
SetProperty(newuser,"co","MEXICO");
// Set the c property using the two-letter country code (ISO 3166 A 2).
SetProperty(newuser,"c","MX");
// Set the countryCode property using the numeric value (ISO 3166 Number) of the country.
SetProperty(newuser,"countryCode","484");
/// <summary>
/// Method to enable a user account in the AD.
/// </summary>
/// <param name="de"></param>
private static void EnableAccount(DirectoryEntry de){
//UF_DONT_EXPIRE_PASSWD 0x10000
int exp = (int) de.Properties["userAccountControl"].Value;
de.Properties["userAccountControl"].Value = exp | 0x0001;
de.CommitChanges();
//UF_ACCOUNTDISABLE 0x0002
int val = (int) de.Properties["userAccountControl"].Value;
de.Properties["userAccountControl"].Value = val & ~0x0002;
de.CommitChanges();
}
/// <summary>
/// Method to add a user to a group
/// </summary>
/// <param name="de"></param>
/// <param name="deUser"></param>
/// <param name="GroupName"></param>
public static void AddUserToGroup(DirectoryEntry de, DirectoryEntry deUser, string GroupName){
DirectorySearcher deSearch = new DirectorySearcher();
deSearch.SearchRoot = de;
deSearch.Filter = "(&(objectClass=group) (cn=" + GroupName +"))";
SearchResultCollection results = deSearch.FindAll();
bool isGroupMember = false;
if (results.Count>0){
DirectoryEntry group = GetDirectoryEntry(results[0].Path);
object members = group.Invoke("Members",null);
foreach ( object member in (IEnumerable) members){
DirectoryEntry x = new DirectoryEntry(member);
if (x.Name! = deUser.Name){
isGroupMember = false;
}
else{
isGroupMember = true;
break;
}
}
if (!isGroupMember){
group.Invoke("Add", new object[] {deUser.Path.ToString()});
}
group.Close();
}
return;
}
/// <summary>
/// Method that creates a new user account
/// </summary>
/// <param name="employeeID"></param>
/// <param name="name"></param>
/// <param name="login"></param>
/// <param name="email"></param>
/// <param name="group"></param>
public void CreateNewUser(string employeeID, string name, string login, string email, string group){
Catalog catalog = new Catalog();
DirectoryEntry de = ADHelper.GetDirectoryEntry();
/// 1. Create user account
DirectoryEntries users = de.Children;
DirectoryEntry newuser = users.Add("CN=" + login, "user");
/// 2. Set properties
SetProperty(newuser,"employeeID", employeeID);
SetProperty(newuser,"givenname", name);
SetProperty(newuser,"SAMAccountName", login);
SetProperty(newuser,"userPrincipalName", login);
SetProperty(newuser,"mail", email);
newuser.CommitChanges();
/// 3. Set password
SetPassword(newuser.Path);
newuser.CommitChanges();
/// 4. Enable account
EnableAccount(newuser);
/// 5. Add user account to groups
AddUserToGroup(de,newuser,group);
/// 6. Create a mailbox in Microsoft Exchange
GenerateMailBox(login);
newuser.Close();
de.Close();
}
/// <summary>
/// Method that disables a user account in the AD and hides user's email from Exchange address lists.
/// </summary>
/// <param name="EmployeeID"></param>
public void DisableAccount(string EmployeeID){
DirectoryEntry de = GetDirectoryEntry();
DirectorySearcher ds = new DirectorySearcher(de);
ds.Filter = "(&(objectCategory=Person)(objectClass=user)(employeeID=" + EmployeeID + "))";
ds.SearchScope = SearchScope.Subtree;
SearchResult results = ds.FindOne();
if(results != null){
DirectoryEntry dey = GetDirectoryEntry(results.Path);
int val = (int)dey.Properties["userAccountControl"].Value;
dey.Properties["userAccountControl"].Value = val | 0x0002;
dey.Properties["msExchHideFromAddressLists"].Value = "TRUE";
dey.CommitChanges();
dey.Close();
}
de.Close();
}
/// <summary>
/// Method that updates user's properties
/// </summary>
/// <param name="employeeID"></param>
/// <param name="department"></param>
/// <param name="title"></param>
/// <param name="company"></param>
public void ModifyUser(string employeeID, string department, string title, string company){
DirectoryEntry de = GetDirectoryEntry();
DirectorySearcher ds = new DirectorySearcher(de);
ds.Filter = "(&(objectCategory=Person)(objectClass=user)(employeeID=" + employeeID + "))";
ds.SearchScope = SearchScope.Subtree;
SearchResult results = ds.FindOne();
if(results!=null){
DirectoryEntry dey = GetDirectoryEntry(results.Path);
SetProperty(dey, "department", department);
SetProperty(dey, "title", title);
SetProperty(dey, "company", company);
dey.CommitChanges();
dey.Close();
}
de.Close();
}
/// <summary>
/// Method that validates if a string has an email pattern.
/// </summary>
/// <param name="mail"></param>
/// <returns></returns>
public bool IsEmail(string mail){
Regex mailPattern = new Regex(@"\w+([-+.]\w+)*@\w+([-.]\w+)*\.\w+([-.]\w+)*");
return mailPattern.IsMatch(mail);
}
/// <summary>
/// Method to extract the alias from an email account.
/// </summary>
/// <param name="mailAddress"></param>
/// <returns></returns>
public string GetAlias(string mailAddress){
if (IsEmail(mailAddress)){
return mailAddress.Substring(0,mailAddress.IndexOf("@"));
}
else{
return "";
}
}
/// <summary>
/// Method that formats a date in the required format
/// needed (AAAAMMDDMMSSSS.0Z) to compare dates in AD.
/// </summary>
/// <param name="date"></param>
/// <returns>Date in valid format for AD</returns>
public string ToADDateString(DateTime date){
string year = date.Year.ToString();
int month = date.Month;
int day = date.Day;
StringBuilder sb = new StringBuilder();
sb.Append(year);
if (month <10){
sb.Append("0");
}
sb.Append(month.ToString());
if (day <10){
sb.Append("0");
}
sb.Append(day.ToString());
sb.Append("000000.0Z");
return sb.ToString();
}
/// <summary>
/// Method that returns a DataTable with a list of users modified from a given date.
/// </summary>
/// <param name="fromdate"></param>
public DataTable GetModifiedUsers(DateTime fromdate){
DataTable dt = new DataTable();
dt.Columns.Add("EmployeeID");
dt.Columns.Add("Name");
dt.Columns.Add("Email");
DirectoryEntry de = GetDirectoryEntry();
DirectorySearcher ds = new DirectorySearcher(de);
StringBuilder filter = new StringBuilder();
filter.Append("(&(objectCategory=Person)(objectClass=user)(whenChanged>=");
filter.Append(date.ToADDateString());
filter.Append("))");
ds.Filter=filter.ToString();
ds.SearchScope = SearchScope.Subtree;
SearchResultCollection results= ds.FindAll();
foreach(SearchResult result in results){
DataRow dr = dt.NewRow();
DirectoryEntry dey = GetDirectoryEntry(result.Path);
dr["EmployeeID"] = dey.Properties["employeeID"].Value;
dr["Name"] = dey.Properties["givenname"].Value;
dr["Email"] = dey.Properties["mail"].Value;
dt.Rows.Add(dr);
dey.Close();
}
de.Close();
return dt;
}
to synchronize a human resources database with an Active Directory (AD). To accomplish my goal, I created a service that used .NET Directory Services, and after some months, the project succeeded. I had to invest a ton of extra hours to the project because I had a hard time finding sample .NET code and documentation related to specific tasks needed to work with AD User Accounts.
Microsoft Technet offers a
script repository to work with AD User Accounts; however, I needed to work with .NET and I could not find samples for all the tasks I needed to program. I promised to myself that one day I would publish the code samples I found and created to help other developers who are working with Directory Services. So, I wish you a happy AD.NET programming and I hope my work saves you some time. The code samples I provide are written in C#.
How to...
- Create a connection to Active Directory
- Create a secure connection to Active Directory
- Validate if a user exists
- Set user's properties
- Set user's country
- Set user's password
- Enable a user account
- Add a user to a group
- Generate a mailbox for a user in Microsoft Exchange Server
- Create a user account
- Disable a user account
- Update user account
- Validate if a string has a correct email pattern
- Extract a user alias from an email account
- Format dates to AD date format (AAAAMMDDMMSSSS.0Z)
- Search users
1. Create a connection to Active Directory
/// <summary>
/// Method used to create an entry to the AD.
/// Replace the path, username, and password.
/// </summary>
/// <returns>DirectoryEntry</returns>
public static DirectoryEntry GetDirectoryEntry(){
DirectoryEntry de = new DirectoryEntry();
de.Path = "LDAP://192.168.1.1/CN=Users;DC=Yourdomain";
de.Username = @"yourdomain\sampleuser";
de.Password = "samplepassword";
return de;
}
2. Create a secure connection to Active Directory
To connect to the AD, you need a user account that belongs to the domain you want to connect to. Most user accounts have permissions to search the AD; however, to modify the AD, you need a user account that is a member of the group of Domain Administrators (DomainAdmin). An account that belongs to this group has high privileges and hardcoding the user and password of this account in your code can compromise the security of the AD. I don't recommend you to create directory entries where usernames and passwords are hardcoded. Try to connect to the AD using a secure connection.
/// <summary>
/// Method used to create an entry to the AD using a secure connection.
/// Replace the path.
/// </summary>
/// <returns>DirectoryEntry</returns>
public static DirectoryEntry GetDirectoryEntry(){
DirectoryEntry de = new DirectoryEntry();
de.Path = "LDAP://192.168.1.1/CN=Users;DC=Yourdomain";
de.AuthenticationType = AuthenticationTypes.Secure;
return de;
}
To connect to the AD using a secure connection, you need to delegate the permissions of a user account with DomainAdmin permissions to the thread that is running a program. For instance, I created an exe and I ran the program using the Run As command to start a program. I delegated the user’s principal identity and culture to the current thread that runs the program. To delegate the principal identity and culture to the current thread, I used the following code:
/// <summary>
/// Establish identity (principal) and culture for a thread.
/// </summary>
public static void SetCultureAndIdentity(){
AppDomain.CurrentDomain.SetPrincipalPolicy(PrincipalPolicy.WindowsPrincipal);
WindowsPrincipal principal = (WindowsPrincipal)Thread.CurrentPrincipal;
WindowsIdentity identity = (WindowsIdentity)principal.Identity;
System.Threading.Thread.CurrentThread.CurrentCulture = new CultureInfo("en-US");
}
3. Validate if a user exists
/// <summary>
/// Method to validate if a user exists in the AD.
/// </summary>
/// <param name="UserName"></param>
/// <returns></returns>
public bool UserExists(string UserName){
DirectoryEntry de = ADHelper.GetDirectoryEntry();
DirectorySearcher deSearch = new DirectorySearcher();
deSearch.SearchRoot =de;
deSearch.Filter = "(&(objectClass=user) (cn=" + UserName +"))";
SearchResultCollection results = deSearch.FindAll();
if(results.Count == 0){
return false;
}
else{
return true;
}
}
4. Set user's properties
/// <summary>
/// Helper method that sets properties for AD users.
/// </summary>
/// <param name="de"></param>
/// <param name="PropertyName"></param>
/// <param name="PropertyValue"></param>
public static void SetProperty(DirectoryEntry de, string PropertyName, string PropertyValue){
if(PropertyValue!=null){
if(de.Properties.Contains(PropertyName)){
de.Properties[PropertyName][0]=PropertyValue;
}
else{
de.Properties[PropertyName].Add(PropertyValue);
}
}
}
5. Set user's country
To set the country property for a user was one of the tasks that took me some time to figure out. After some hours of research I realized that you need to know the ISO 3166 Codes for countries and set three properties to define a user’s country: c, co, and countryCode.
// Set the co property using the name of the country.
SetProperty(newuser,"co","MEXICO");
// Set the c property using the two-letter country code (ISO 3166 A 2).
SetProperty(newuser,"c","MX");
// Set the countryCode property using the numeric value (ISO 3166 Number) of the country.
SetProperty(newuser,"countryCode","484");
6. Set user's password
Setting the password for a user requires some work. I will walk you through the steps I followed to set a password for a user:
Create or download a helper class that generates random passwords that comply with the strong password rules. I was short of time and couldn’t develop one, so I downloaded the RandomPassword class created by Obviex™.
Create a method that consumes the RandomPassword helper class.
/// <summary>
/// Method that consumes a helper class library
/// to generate random passwords.
/// </summary>
/// <returns></returns>
public string SetSecurePassword(){
RandomPassword rp = new RandomPassword();
return rp.Generate(8,8);
}
Set the password property using the usr.Invoke method.
/// <summary>
/// Method to set a user's password
/// <param name="path"></param>
public void SetPassword(string path){
DirectoryEntry usr = new DirectoryEntry();
usr.Path = path;
usr.AuthenticationType = AuthenticationTypes.Secure;
object[] password = new object[] {SetSecurePassword()};
object ret = usr.Invoke("SetPassword", password );
usr.CommitChanges();
usr.Close();
}
The usr.Invoke method can be called once within the same AppDomain, otherwise your program will crash. If you place a call to the usr.Invoke method inside a for construct, the first run will be succesful, but the second one will crash the compiler. I created a workaround that helped me to solve this problem. I made a separate console application (SetPassword.exe) and I called and started the process programatically from the SetPassword method.- Download the
 SetPassword project.
 - Copy the SetPassword.exe file in your application.
- Call and start SetPassword.exe from you application.
/// </summary>
/// Method that calls and starts SetPassword.exe
/// <param name="path"></param>
/// <param name="password"></param>
public void SetPassword(string path, string password){
StringBuilder args = new StringBuilder();
args.Append(path);
args.Append(" ");
args.Append(password);
ProcessStartInfo startInfo = new ProcessStartInfo("SetPassword.exe",args.ToString());
startInfo.WindowStyle = ProcessWindowStyle.Hidden;
Process.Start(startInfo);
}
- Download the
7. Enable a user account
/// <summary>
/// Method to enable a user account in the AD.
/// </summary>
/// <param name="de"></param>
private static void EnableAccount(DirectoryEntry de){
//UF_DONT_EXPIRE_PASSWD 0x10000
int exp = (int) de.Properties["userAccountControl"].Value;
de.Properties["userAccountControl"].Value = exp | 0x0001;
de.CommitChanges();
//UF_ACCOUNTDISABLE 0x0002
int val = (int) de.Properties["userAccountControl"].Value;
de.Properties["userAccountControl"].Value = val & ~0x0002;
de.CommitChanges();
}
8. Add a user to a group
/// <summary>
/// Method to add a user to a group
/// </summary>
/// <param name="de"></param>
/// <param name="deUser"></param>
/// <param name="GroupName"></param>
public static void AddUserToGroup(DirectoryEntry de, DirectoryEntry deUser, string GroupName){
DirectorySearcher deSearch = new DirectorySearcher();
deSearch.SearchRoot = de;
deSearch.Filter = "(&(objectClass=group) (cn=" + GroupName +"))";
SearchResultCollection results = deSearch.FindAll();
bool isGroupMember = false;
if (results.Count>0){
DirectoryEntry group = GetDirectoryEntry(results[0].Path);
object members = group.Invoke("Members",null);
foreach ( object member in (IEnumerable) members){
DirectoryEntry x = new DirectoryEntry(member);
if (x.Name! = deUser.Name){
isGroupMember = false;
}
else{
isGroupMember = true;
break;
}
}
if (!isGroupMember){
group.Invoke("Add", new object[] {deUser.Path.ToString()});
}
group.Close();
}
return;
}
9. Generate a mailbox for a user in Microsoft Exchange Server
You might need to create a mailbox for a user in Microsoft Exchange Server. Network configuration and server architecture can add complexity to the process of programmatically creating mailboxes for users, but you know, there’s always a workaround. You can invoke a script that creates mailboxes from a remote machine. I will walk you through the steps I followed to create a mailbox for a user in Microsoft Exchange Server.
- On the Domain Controller server, create the directory C:\TestRemoteMailbox.
- Copy the script Mailbox.vbs to the directory C:\TestRemoteMailbox.
Note: Mailbox.vbs is a script that creates MailBoxes in Microsoft Exchange. - Copy the script WSHControl.vbs to your application directory.
Note: WSHControl.vbs is a script that invokes the MailBox.vbs script on a remote machine (Domain Controller). - From your application, call and start WSHControl.vbs.
/// <summary>
/// Method that calls and starts a WSHControl.vbs
/// </summary>
/// <param name="userAlias"></param>
public void GenerateMailBox(string userAlias){
StringBuilder mailargs = new StringBuilder();
mailargs.Append("WSHControl.vbs");
mailargs.Append(" ");
mailargs.Append(userAlias);
ProcessStartInfo sInfo = new ProcessStartInfo("Wscript.exe",mailargs.ToString());
sInfo.WindowStyle = ProcessWindowStyle.Hidden;;
Process.Start(sInfo);
}
10. Create a user account
/// <summary>
/// Method that creates a new user account
/// </summary>
/// <param name="employeeID"></param>
/// <param name="name"></param>
/// <param name="login"></param>
/// <param name="email"></param>
/// <param name="group"></param>
public void CreateNewUser(string employeeID, string name, string login, string email, string group){
Catalog catalog = new Catalog();
DirectoryEntry de = ADHelper.GetDirectoryEntry();
/// 1. Create user account
DirectoryEntries users = de.Children;
DirectoryEntry newuser = users.Add("CN=" + login, "user");
/// 2. Set properties
SetProperty(newuser,"employeeID", employeeID);
SetProperty(newuser,"givenname", name);
SetProperty(newuser,"SAMAccountName", login);
SetProperty(newuser,"userPrincipalName", login);
SetProperty(newuser,"mail", email);
newuser.CommitChanges();
/// 3. Set password
SetPassword(newuser.Path);
newuser.CommitChanges();
/// 4. Enable account
EnableAccount(newuser);
/// 5. Add user account to groups
AddUserToGroup(de,newuser,group);
/// 6. Create a mailbox in Microsoft Exchange
GenerateMailBox(login);
newuser.Close();
de.Close();
}
11. Disable a user account
/// <summary>
/// Method that disables a user account in the AD and hides user's email from Exchange address lists.
/// </summary>
/// <param name="EmployeeID"></param>
public void DisableAccount(string EmployeeID){
DirectoryEntry de = GetDirectoryEntry();
DirectorySearcher ds = new DirectorySearcher(de);
ds.Filter = "(&(objectCategory=Person)(objectClass=user)(employeeID=" + EmployeeID + "))";
ds.SearchScope = SearchScope.Subtree;
SearchResult results = ds.FindOne();
if(results != null){
DirectoryEntry dey = GetDirectoryEntry(results.Path);
int val = (int)dey.Properties["userAccountControl"].Value;
dey.Properties["userAccountControl"].Value = val | 0x0002;
dey.Properties["msExchHideFromAddressLists"].Value = "TRUE";
dey.CommitChanges();
dey.Close();
}
de.Close();
}
12. Update user account
/// <summary>
/// Method that updates user's properties
/// </summary>
/// <param name="employeeID"></param>
/// <param name="department"></param>
/// <param name="title"></param>
/// <param name="company"></param>
public void ModifyUser(string employeeID, string department, string title, string company){
DirectoryEntry de = GetDirectoryEntry();
DirectorySearcher ds = new DirectorySearcher(de);
ds.Filter = "(&(objectCategory=Person)(objectClass=user)(employeeID=" + employeeID + "))";
ds.SearchScope = SearchScope.Subtree;
SearchResult results = ds.FindOne();
if(results!=null){
DirectoryEntry dey = GetDirectoryEntry(results.Path);
SetProperty(dey, "department", department);
SetProperty(dey, "title", title);
SetProperty(dey, "company", company);
dey.CommitChanges();
dey.Close();
}
de.Close();
}
13. Validate if a string has a correct email pattern
/// <summary>
/// Method that validates if a string has an email pattern.
/// </summary>
/// <param name="mail"></param>
/// <returns></returns>
public bool IsEmail(string mail){
Regex mailPattern = new Regex(@"\w+([-+.]\w+)*@\w+([-.]\w+)*\.\w+([-.]\w+)*");
return mailPattern.IsMatch(mail);
}
14. Extract a user alias from an email account
/// <summary>
/// Method to extract the alias from an email account.
/// </summary>
/// <param name="mailAddress"></param>
/// <returns></returns>
public string GetAlias(string mailAddress){
if (IsEmail(mailAddress)){
return mailAddress.Substring(0,mailAddress.IndexOf("@"));
}
else{
return "";
}
}
15. Format dates to AD date format (AAAAMMDDMMSSSS.0Z)
/// <summary>
/// Method that formats a date in the required format
/// needed (AAAAMMDDMMSSSS.0Z) to compare dates in AD.
/// </summary>
/// <param name="date"></param>
/// <returns>Date in valid format for AD</returns>
public string ToADDateString(DateTime date){
string year = date.Year.ToString();
int month = date.Month;
int day = date.Day;
StringBuilder sb = new StringBuilder();
sb.Append(year);
if (month <10){
sb.Append("0");
}
sb.Append(month.ToString());
if (day <10){
sb.Append("0");
}
sb.Append(day.ToString());
sb.Append("000000.0Z");
return sb.ToString();
}
16. Search users
When you use Directory Services, you can accomplish many interesting tasks such as searching and filtering users. The DirectorySearcher object allows you to query the AD. The following sample code queries the AD to search all the user accounts that were modified from a given date. The results are stored in a DataTable, so you can easily databind them.
/// <summary>
/// Method that returns a DataTable with a list of users modified from a given date.
/// </summary>
/// <param name="fromdate"></param>
public DataTable GetModifiedUsers(DateTime fromdate){
DataTable dt = new DataTable();
dt.Columns.Add("EmployeeID");
dt.Columns.Add("Name");
dt.Columns.Add("Email");
DirectoryEntry de = GetDirectoryEntry();
DirectorySearcher ds = new DirectorySearcher(de);
StringBuilder filter = new StringBuilder();
filter.Append("(&(objectCategory=Person)(objectClass=user)(whenChanged>=");
filter.Append(date.ToADDateString());
filter.Append("))");
ds.Filter=filter.ToString();
ds.SearchScope = SearchScope.Subtree;
SearchResultCollection results= ds.FindAll();
foreach(SearchResult result in results){
DataRow dr = dt.NewRow();
DirectoryEntry dey = GetDirectoryEntry(result.Path);
dr["EmployeeID"] = dey.Properties["employeeID"].Value;
dr["Name"] = dey.Properties["givenname"].Value;
dr["Email"] = dey.Properties["mail"].Value;
dt.Rows.Add(dr);
dey.Close();
}
de.Close();
return dt;
}
Subscribe to:
Posts (Atom)